

Classic Blur Lightroom Presets
Today, I am thrilled to introduce a stunning set of Classic Blur Lightroom Presets designed to elevate your photo editing experience effortlessly. We’ve been receiving numerous requests for high-quality Lightroom presets, and I’m delighted to finally share an exceptional one with you. Whether you’re a professional photographer, a social media enthusiast, or just someone who loves enhancing their images, this preset is a must-have in your editing toolkit.
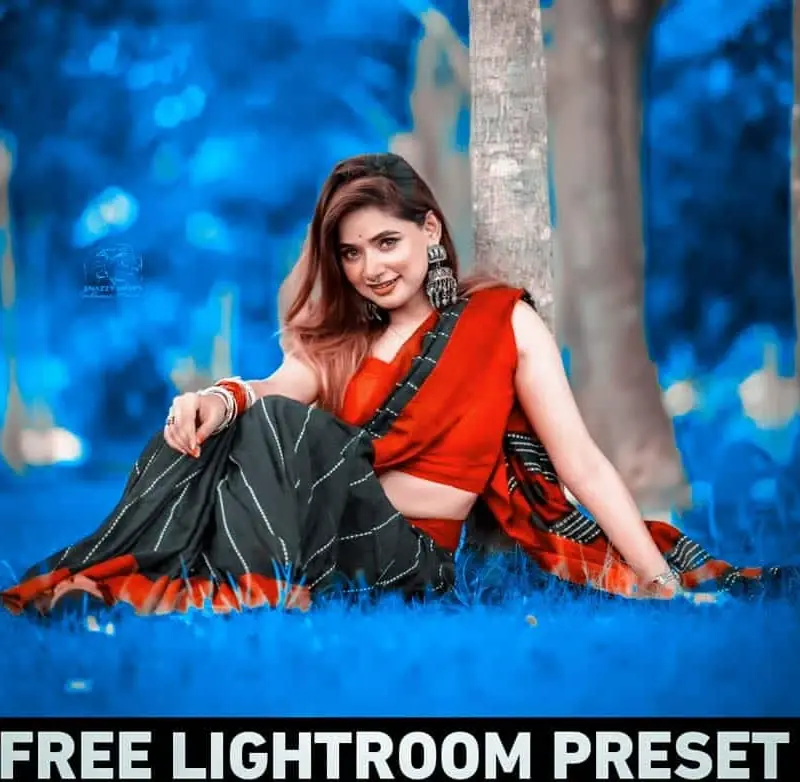
With just a single click, you can instantly transform your photos by creating a beautifully blurred blue background, adding depth and an elegant aesthetic to your images. This effect is perfect for portrait photography, product shots, and artistic compositions, making your subject stand out while maintaining a soft, professional look. The best part? All the presets available on our website maintain the highest premium quality while remaining completely free to download and use on your mobile device.
Unlike many complex editing techniques that require manual adjustments, this Classic Blur preset simplifies the process, saving you valuable time while delivering professional-level results. Whether you’re an experienced Lightroom user or just starting out, this preset ensures that you can achieve an impressive blur effect with minimal effort.
If you are new to Lightroom presets, don’t worry! In this article, I will walk you through the step-by-step process of using them, so you can maximize the potential of this preset and make the most of your editing experience. By following the guide, you’ll quickly learn how to apply the preset, adjust the intensity if needed, and create visually striking images that look effortlessly polished.
Make sure to read this entire article to fully understand how to use the Classic Blur Lightroom Preset effectively. With this powerful tool at your disposal, you can achieve smooth, professional edits in seconds. Download the preset today and start transforming your photos like never before. Enjoy editing!
What are Classic Blur Lightroom Presets?
Classic Blur Lightroom Presets are expertly crafted predefined settings that allow you to effortlessly apply a soft blur effect to the background of your photos while incorporating a distinctive blue tone. These presets are designed to help you enhance your images quickly and easily, delivering a polished and artistic look with just one click.
One of the standout features of the Classic Blur preset is its ability to create a visually striking contrast by selectively blurring the background while keeping the subject sharp and well-defined. This effect not only adds depth to your images but also ensures that the focus remains on the main subject, making your photos more engaging and professional. The subtle blue hue infused within the blur further enhances the aesthetic, giving your pictures a calming, cinematic feel that sets them apart.
These Lightroom presets are perfect for photographers, social media influencers, bloggers, and content creators who want to achieve a refined, professional look without spending hours on manual editing. Whether you’re capturing portraits, product photography, travel shots, or lifestyle content, this preset helps you create a consistent and visually appealing style in no time.
By integrating Classic Blur Lightroom Presets into your photo editing workflow, you can maintain a cohesive and high-quality aesthetic, elevating your images effortlessly. With their easy-to-use, time-saving nature, these presets are an essential tool for anyone looking to enhance their photos while preserving creative control.
How to Download Classic Blur Lightroom Presets?
Downloading the Classic Blur Lightroom Presets is a quick and straightforward process. Follow these easy steps to get the preset on your device and start enhancing your photos instantly.
Step 1: Visit the Website
Start by navigating to the website where the Classic Blur Lightroom Presets are available for download. These presets are typically found on photography blogs, editing websites, or dedicated preset download pages.
Step 2: Locate the Download Link
Once on the website, search for the Classic Blur Lightroom Presets section. There should be a clearly visible download button or link to access the preset.
Step 3: Click the Download Button
Click on the download button to begin the process. Depending on the website, you may be required to sign up, provide an email address, or follow simple steps to unlock the free preset. Some sites offer these presets for free, while others may charge a small fee.
Step 4: Save the File
After clicking the download link, the preset file will be saved to your device. The file is typically in a .zip format, containing the necessary preset files.
Step 5: Extract the Files
If the downloaded preset is inside a .zip folder, extract the files using a built-in extraction tool or any file management app. Once extracted, you’ll find the Lightroom preset files, usually in .xmp or .lrtemplate format.
Step 6: Import the Presets into Lightroom
To start using the Classic Blur Lightroom Preset, follow the steps below to import it into Lightroom:
On Desktop (Lightroom Classic CC or Lightroom CC):
- Open Adobe Lightroom on your computer.
- Navigate to the Develop Module.
- Look for the Presets Panel on the left-hand side.
- Right-click inside the panel and select Import.
- Find the extracted Classic Blur preset files on your computer.
- Select the files and click Import.
On Mobile (Lightroom Mobile App):
- Open the Lightroom Mobile App.
- Tap on the Presets Panel under the editing tools.
- Click on the three-dot menu and select Import Preset.
- Locate the downloaded Classic Blur preset files on your phone.
- Tap to import the presets into Lightroom.
Step 7: Apply the Classic Blur Preset
Now that you have successfully imported the preset, applying it to your photos is simple:
- Open a photo in Lightroom.
- Go to the Presets Panel and select Classic Blur from the list.
- Click or tap to apply the effect.
- The preset will instantly enhance your photo with a stunning blue-toned blur effect, creating a professional and aesthetic background.
That’s it! Now you’re ready to edit your photos effortlessly using the Classic Blur Lightroom Preset. Enjoy your new high-quality, time-saving editing experience!
How to Use Classic Blur Lightroom Presets on Lightroom Desktop (Classic or CC Version)
Editing photos with Lightroom presets can save you time while ensuring a consistent, professional look. If you’re using Adobe Lightroom Classic or Lightroom CC on your desktop or laptop, follow this detailed guide to import and apply the Classic Blur Lightroom Preset effortlessly.
Step 1: Open Lightroom
Launch Adobe Lightroom on your desktop or laptop. Ensure that you’re using either Lightroom Classic CC or Lightroom CC, as these versions support the use of custom presets.
Step 2: Import Your Photo
Before applying the preset, you need to import the photo(s) you want to edit:
- Navigate to the Library module.
- Click on the Import button at the bottom left corner.
- Select the photos you want to edit.
- Click Import again to load them into Lightroom.
Step 3: Access the Develop Module
Once your photo is imported, switch to the Develop module for editing:
- Click on Develop in the top-right menu of Lightroom.
- This module provides all the necessary editing tools, including the Presets Panel.
Step 4: Locate the Presets Panel
The Presets Panel is where all your saved and imported presets are stored:
- Look at the left sidebar in the Develop module.
- If you don’t see the Presets Panel, click the triangle icon next to Presets to expand it.
Step 5: Import the Classic Blur Lightroom Preset (If Not Already Installed)
If you haven’t imported the Classic Blur Preset yet, follow these steps:
- Right-click anywhere inside the Presets Panel.
- Select Import from the dropdown menu.
- Locate the folder where you saved the Classic Blur Preset files (.xmp or .lrtemplate format).
- Select the preset files and click Import.
- The preset will now appear in your Presets Panel, ready for use.
Step 6: Apply the Classic Blur Preset
Once your preset is imported, you can apply it to your photo instantly:
- In the Presets Panel, browse through your imported presets.
- Click on Classic Blur to apply it to your selected photo.
- Lightroom will automatically adjust the image based on the preset settings, modifying aspects such as blur intensity, color balance, contrast, and exposure.
Step 7: Fine-Tune the Settings (Optional)
Presets provide a strong foundation, but every photo is unique. After applying the Classic Blur Preset, you may want to fine-tune some settings:
- Adjust exposure to balance brightness.
- Modify contrast to enhance depth.
- Tweak color tones if necessary.
- Use the adjustment brush to refine blurred areas if needed.
Step 8: Save & Export Your Edited Photo
Once you’re satisfied with your edits, save the final image:
- Click File > Export at the top menu.
- Choose the destination folder on your computer.
- Select the desired file format (JPEG, PNG, TIFF, etc.).
- Adjust quality settings as needed.
- Click Export, and your beautifully edited photo will be saved and ready to use!
By following these steps, you can seamlessly integrate the Classic Blur Lightroom Preset into your editing workflow, enhancing your images with a professional, soft-focus aesthetic. Enjoy effortless editing and create visually stunning photos in just a few clicks!
How to Use Classic Blur Lightroom Presets on Lightroom Mobile
Editing on the go has never been easier with Lightroom Mobile, a powerful photo-editing app available on iOS and Android. Whether you’re a professional photographer or a beginner, using Classic Blur Lightroom Presets can help you achieve a stunning, soft-focus effect in just a few taps. Follow this simple guide to download, import, and apply your preset on Lightroom Mobile.
Step 1: Download and Install Lightroom Mobile
Before getting started, make sure you have Adobe Lightroom Mobile installed on your smartphone or tablet. The app is available for free on both iOS and Android and offers premium features for advanced editing.
Download Lightroom Mobile from:
📌 Apple App Store (for iPhones & iPads)
📌 Google Play Store (for Android devices)
Step 2: Import Your Photo into Lightroom
Once Lightroom Mobile is installed, follow these steps to import your photo:
- Open the Lightroom Mobile app.
- Tap the Add Photos button (usually a + icon).
- Select the photo you want to edit from your gallery or camera roll.
- Tap Import to load the image into Lightroom.
Step 3: Access the Presets Panel
After importing your photo, navigate to the Presets Panel to apply your preset:
- Open the photo in the editing interface.
- Scroll through the bottom toolbar and tap Presets.
- If the Classic Blur Preset is already imported, you’ll find it here.
Step 4: Import the Classic Blur Lightroom Preset (If Not Already Imported)
If you haven’t imported the Classic Blur Preset, follow these steps:
- Tap the three dots (•••) at the top-right of the Presets Panel.
- Select Import Presets from the dropdown menu.
- Navigate to the preset file (.DNG format) saved on your device.
- Select the Classic Blur Preset, and it will be added to your preset library.
Step 5: Apply the Classic Blur Preset
Once imported, applying the Classic Blur Preset is quick and easy:
- Go to the Presets Panel and browse through the list of available presets.
- Tap on Classic Blur to apply it to your photo.
- The preset will instantly adjust the background blur, color tone, contrast, and exposure to enhance the image.
Step 6: Adjust the Photo (Optional)
While the preset applies automatic enhancements, you can further refine the image:
✅ Adjust Exposure if the photo is too bright or dark.
✅ Fine-tune Contrast, Highlights, and Shadows for a balanced look.
✅ Modify Saturation and Vibrance to match your preferred color tone.
✅ Use the Selective Editing Tool to refine the blur effect if needed.
Step 7: Save or Share Your Edited Photo
Once you’re happy with the edits, it’s time to export and share your masterpiece:
- Tap the Share icon (located in the upper-right corner).
- Choose Save to Device to store the edited photo on your phone.
- Select Export as JPG, PNG, or other formats depending on your needs.
- Instantly share your photo on Instagram, Facebook, or any other platform directly from Lightroom Mobile!
Tips for Using Lightroom Presets Effectively
Lightroom presets are an incredible tool for streamlining your editing process and achieving a consistent, professional aesthetic. However, to make the most of them, it’s essential to use them strategically. Here are some expert tips to enhance your photo editing workflow:
1. Experiment with Multiple Presets
Not all photos respond the same way to a single preset. Different lighting conditions, colors, and compositions can impact the final result. Try multiple presets on an image to see which one enhances it best. Many professional photographers keep a selection of go-to presets for various styles, such as moody, vibrant, vintage, or cinematic looks.
2. Use Presets as a Starting Point
Presets offer a fantastic foundation for editing, but they aren’t always a one-click solution. Adjustments may be necessary depending on the photo’s exposure, white balance, contrast, or saturation levels. Fine-tune the settings to customize the preset to match the unique mood and style of each image.
3. Organize Your Presets for Efficiency
If you use multiple presets, keeping them well-organized will save time and improve workflow. You can:
✔ Group presets into folders based on categories like “Portraits,” “Landscapes,” or “Black & White.”
✔ Mark favorite presets for quick access.
✔ Delete outdated or unused presets to declutter your workspace.
4. Customize Presets for a Unique Look
While presets provide a quick enhancement, adding personal touches makes your photos stand out. Experiment with:
✅ Adjusting the tone curve to refine highlights and shadows.
✅ Tweaking the HSL panel to fine-tune color vibrancy.
✅ Applying selective edits to emphasize important details.
By mastering these Lightroom preset techniques, you can save time, maintain a cohesive visual identity, and produce stunning, high-quality images that elevate your photography or social media presence.
Frequently Asked Questions
What are Classic Blur Lightroom Presets?
Classic Blur Lightroom Presets are pre-configured editing settings designed to create a soft, blurred background effect with a distinct blue tone. These presets add an artistic, cinematic feel to your photos with minimal effort. They are especially useful for enhancing portraits, product photography, and creative shots where the subject needs to stand out against a beautifully blurred backdrop.
Can I use Classic Blur Lightroom Presets on my phone?
Yes! Classic Blur Presets are fully compatible with Lightroom Mobile. After downloading, you can import the preset into Lightroom Mobile (usually in .DNG format) and apply it instantly. This feature allows for on-the-go editing, making it easier to enhance your images directly from your smartphone or tablet.
Are Classic Blur Lightroom Presets free to download?
Some versions of Classic Blur Lightroom Presets are available for free, while others may require a one-time purchase or a subscription. Check the website offering the presets to see if they are free, part of a premium bundle, or available at a discounted price. Many creators offer free sample packs before upgrading to a full premium collection.
Can I use Classic Blur Presets for all types of photos?
While these presets work exceptionally well for portraits, outdoor photography, and product images, they may not be ideal for every photo type. The blue-toned blur effect works best when the subject contrasts well with the background. If using them for landscapes, architecture, or high-detail images, you may need to adjust the blur intensity and color settings for a more natural look.
Can I customize Classic Blur Presets after applying them?
Absolutely! Presets act as a starting point for your edits. After applying a Classic Blur preset, you can adjust various settings like:
✅ Blur intensity – Increase or decrease the background blur for a subtle or dramatic effect.
✅ Color tones – Modify the blue tint to match your preferred aesthetic.
✅ Exposure & Contrast – Fine-tune brightness, shadows, and highlights to suit your image.
Can I create my own preset after using the Classic Blur Preset?
Yes! Once you’ve applied and modified a preset to match your vision, you can save your custom adjustments as a new preset for future use.
For Lightroom Desktop:
✔ Open the Develop Module
✔ Click the + sign under the Presets panel
✔ Select Create Preset, name it, and save it for quick access later.
For Lightroom Mobile:
✔ Apply your adjustments
✔ Tap the three-dot menu in the Presets panel
✔ Choose Create Preset, name it, and save it
Can I use Classic Blur Presets for social media photos?
Yes! These presets are perfect for social media platforms like Instagram, Facebook, Pinterest, and TikTok. The blurred background effect enhances the subject’s focus, creating a professional, eye-catching image that stands out in feeds and stories. Many influencers, bloggers, and photographers use Classic Blur Presets to maintain a consistent and visually appealing aesthetic on their social media pages.
Conclusion
Classic Blur Lightroom Presets provide an efficient and creative way to transform your photos with a soft, blurred background and a beautiful blue tone. Whether you’re a beginner or a professional, these presets allow you to achieve high-quality, cinematic edits in just a few clicks.
With the flexibility to customize settings, use them on mobile or desktop, and apply them across various photography styles, Classic Blur Presets are a valuable tool for photographers, content creators, and social media enthusiasts. If you’re looking for a quick and effective way to enhance your photos, these presets offer the perfect solution for achieving stunning, professional results effortlessly.