

If you’re looking to elevate the quality of your photos and create a more professional look, today’s guide will provide you with valuable insights on how to enhance your photography skills. Specifically, we’re diving into Lightroom blur background presets that can add a striking blue tone to your photo’s background, transforming the overall aesthetic.
These presets are meticulously designed to enhance your images with minimal effort, allowing you to achieve stunning results in no time. Whether you’re an enthusiast looking to refine your editing or a social media creator aiming to boost engagement, using a blurred background is a fantastic technique to make your photos stand out. If you’ve ever noticed how pictures with a soft-focus background often capture more attention on platforms like Instagram, Facebook, and other social media sites, you’ll understand the power of a professional-looking photo.
The art of creating blurred backgrounds, with the subject in sharp focus, is a proven way to draw the viewer’s eye to the most important elements of the photo. It adds depth, enhances the subject, and gives the image a polished, high-quality look. This technique is especially effective for portraits, product photography, and lifestyle shots, making it a go-to method for photographers looking to create eye-catching content.
In this article, I’ll guide you through the simple steps of using Lightroom presets that apply this blur effect and add an appealing blue tone to your background. These presets not only simplify the process but also provide a quick way to take your photo editing skills to a more professional level. You don’t need advanced knowledge of Lightroom to use these presets — just follow the steps, and you’ll be on your way to editing photos like a pro.
By the end of this guide, you’ll be able to create images that look not only more polished but also more engaging. Your photos will capture the attention they deserve, leading to more likes, shares, and comments across social media platforms. This is an exciting opportunity to take your photo-editing game to the next level with just a few simple adjustments.
So, let’s dive deeper into the world of Lightroom editing. You’ll soon discover how to effortlessly create visually stunning images that stand out from the crowd and give your photos that professional edge. Whether you’re a hobbyist photographer or a seasoned professional, these techniques will enhance your ability to create high-quality, attention-grabbing content. Keep reading to learn how Lightroom blur background presets can transform your photos and enhance your editing process.
What are Blue Background Lightroom Presets?
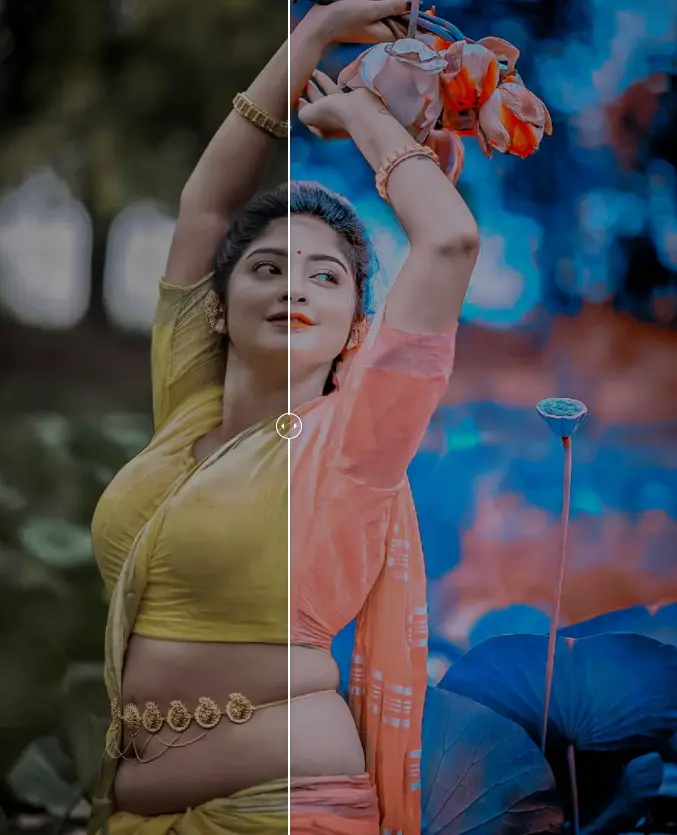
Blue background Lightroom presets are pre-configured filters or settings within Adobe Lightroom designed to alter the background of a photo by adding a smooth, blurred blue tone. These presets are widely used by photographers, influencers, and social media enthusiasts looking to create eye-catching, professional images with minimal effort. By applying these presets, you can easily infuse your photo’s background with a serene and calming blue hue, which makes the subject in the foreground stand out sharply and clearly.
How Do Blue Background Lightroom Presets Work?
Blue background Lightroom presets function by adjusting several key elements of the image, such as exposure, contrast, saturation, and most importantly, the background’s tone. The presets blur the background while adding blue hues to create a tranquil, cohesive feel. The end result is a softened background that enhances the depth of the image, bringing the subject to the forefront. The blue tone helps achieve a professional, polished look while allowing the subject to appear crisp and focused, providing an overall elevated image quality.
Key Features of Blue Background Lightroom Presets:
- Background Blurring: These presets work by softening the background, often through aperture and lens adjustments in Lightroom. This blurring effect creates a bokeh-like appearance, focusing the viewer’s attention on the subject.
- Blue Color Toning: The preset incorporates blue hues into the background, creating cool, serene tones. This toning effect gives the photo a polished, professional look while ensuring that the background doesn’t overwhelm the subject.
- Focus on Subject: By softening and desaturating the background, these presets highlight the main subject of the photo. This ensures that the subject is visually dominant, enhancing its prominence and making it stand out more than the background.
- Time-Saving: These presets apply multiple adjustments with just a single click, significantly reducing the time spent on manual editing. The presets offer a streamlined way to achieve high-quality results quickly and efficiently.
Why Use Blue Background Lightroom Presets?
- Aesthetic Appeal: The calming, blue-toned background adds sophistication and tranquility to your images. This effect brings attention to the subject while keeping the background visually engaging but unobtrusive, making the overall photo feel balanced.
- Consistency: If you are editing a series of photos—such as for social media, blogs, or portfolios—these presets help maintain a consistent and cohesive aesthetic across all your images. This is especially important for creating a unified look on platforms like Instagram or Pinterest.
- Ease of Use: Blue background presets are beginner-friendly, making it easy for new photographers to achieve professional-quality edits. Even seasoned photographers can save valuable time without compromising the quality of their work.
Where to Use Blue Background Lightroom Presets
- Portrait Photography: Blue background presets are ideal for portraits, as they allow the subject to stand out against a soft, dreamy blue backdrop. This effect works well for both professional headshots and casual portraiture.
- Product Photography: These presets are also effective in product photography, where the blue-toned background provides a clean, modern, and stylish appearance that makes products look polished and appealing.
- Social Media Posts: Perfect for platforms like Instagram, Pinterest, or any site that values visual impact. The blue background can be used to create a signature aesthetic for your personal brand, making your posts instantly recognizable.
- Wedding or Event Photography: These presets add a touch of elegance to event photography, ensuring that subjects stand out against a soft, refined background. This effect is perfect for enhancing the overall look of wedding or event photos.
Using blue background Lightroom presets enables photographers of all levels to create professional-quality images with ease. Whether you are editing personal photos, content for social media, or images for professional projects, these presets help you achieve a polished and cohesive visual aesthetic in no time. With their ability to bring out the best in your subjects while maintaining a serene, sophisticated background, blue background Lightroom presets are a valuable tool for enhancing your photo editing workflow.
How To Use Blur Background Lightroom Presets?
Using blur background Lightroom presets is a quick and efficient way to enhance your photos, creating a professional look with minimal effort. By following a few simple steps, you can apply a smooth, blurred background that highlights your subject beautifully. Here’s a detailed guide on how to use these presets to transform your images:
Step 1: Download the Lightroom Preset
To begin, you’ll need to download the blur background Lightroom preset. There are several sources online where you can find high-quality presets, both free and paid. After downloading the preset file, make sure to extract it from any compressed folders, if necessary, before proceeding to the next step.
Step 2: Import the Preset into Lightroom
- Open Adobe Lightroom on your computer.
- Navigate to the Develop Module within Lightroom.
- On the left panel, locate the “Presets” section.
- Right-click on the “Presets” panel and select Import.
- Navigate to the location where you saved the downloaded preset file and select it.
- Once imported, the preset will appear under the User Presets section in the Presets panel.
Step 3: Select Your Photo
Next, choose the photo you want to edit from your Lightroom catalog. For optimal results, it’s recommended to select an image with a clear subject and a background that would benefit from the smooth blur effect. Portraits and product photography often work particularly well with this type of preset.
Step 4: Apply the Blur Background Preset
- In the Develop Module, click on the preset you imported under User Presets.
- The preset will automatically apply the blur effect to the background, along with any additional adjustments such as color toning, exposure, and contrast. Note: If you wish to refine the effect further, feel free to adjust the settings like Exposure, Contrast, or Saturation using the sliders in the Develop panel. This allows you to tailor the effect to better suit your specific image.
Step 5: Refine the Background Blur (Optional)
If you want to fine-tune the background blur or modify the intensity of the blue hue applied, here are a couple of ways to do so:
- Use the Adjustment Brush: This tool allows you to paint over areas where you want to refine the blur or apply the blue tint more selectively.
- Set the brush to affect the Background by reducing the sharpness and adding the blue tint.
- Adjust the Blur slider in the brush settings to enhance the background blur.
- Use the Radial Filter: For more precise control, the Radial Filter tool can create a custom blur effect around your subject. You can position the filter so that the focus remains on the subject while the rest of the image is blurred.
Step 6: Final Adjustments and Export
After applying the preset and making any necessary refinements, review your image to ensure the composition looks balanced. If needed, you can make additional tweaks, such as adjusting White Balance, Exposure, or Contrast, to perfect the final look.
Once satisfied with the result, go to File > Export to save your edited image. Be sure to choose your desired format (JPEG, TIFF, etc.), resolution, and quality settings before exporting.
By following these simple steps, you can easily achieve a beautifully blurred background that highlights your subject, making your photos look more professional and polished.
Frequently Asked Questions
What are Blur Background Lightroom Presets?
Blur background Lightroom presets are pre-configured settings in Adobe Lightroom designed to apply a blurred, out-of-focus background to your photos. These presets adjust various aspects of your image, such as exposure, contrast, and color, to create a smooth, often blue, gradient blur that enhances the focus on the subject in the foreground. The result mimics the depth-of-field effect achieved with a high-quality camera lens, creating a professional, polished look.
Can I Use Blur Background Presets on Any Type of Photo?
Yes! Blur background presets are versatile and can be applied to a wide range of photo types, including portraits, product photography, landscape shots, and event photography. While the effect works well for various images, it tends to have the most noticeable impact on portraits. The blurred background helps to draw attention to the subject, giving it prominence and a more refined appearance.
Are Blur Background Lightroom Presets Free or Paid?
Blur background Lightroom presets are available in both free and paid versions. Free presets are commonly found on photography blogs and websites, offering basic adjustments for background blur. However, they may have fewer customization options or not provide the same level of quality as premium paid presets. Paid versions typically come with additional features, better flexibility, and may include customer support, tutorials, or preset variations tailored to different types of photos.
Can I Adjust the Intensity of the Blur Effect?
Yes! While the preset applies a predefined blur effect, you can adjust its intensity to suit your preferences. Using Lightroom’s Adjustment Brush or Radial Filter tools, you can fine-tune the blur effect by selectively applying it to areas that need more or less focus. You can also modify the Clarity, Dehaze, or Sharpness sliders in the Develop module for further refinement.
Will Using a Blur Background Preset Affect the Quality of My Photo?
No, a properly designed Lightroom preset will not reduce the quality of your image. Instead, it should enhance your photo by refining the background blur, helping your subject stand out more clearly. As long as you start with a high-resolution image, the quality will be maintained. Some presets even improve the overall resolution by adding details and sharpness, ensuring that your final output looks professional.
Can I Use Multiple Presets for One Photo?
Yes, you can layer multiple presets or combine their effects to create a custom look. For example, you might first apply a blur background preset and then use another preset to adjust the image’s colors or tones. It’s important to tweak the individual settings to ensure that the presets blend well together and produce a natural, cohesive result.
Will Blur Background Presets Work on All Lightroom Versions?
Blur background presets are compatible with both Lightroom Classic and Lightroom CC (cloud-based). However, the method of installation may differ depending on the version you use. Ensure that your Lightroom version supports .xmp or .lrtemplate files, as these are the formats used for importing presets.
Conclusion
Blur Background Lightroom Presets are a game-changing tool for anyone looking to elevate the quality of their photos with minimal effort. Whether you’re a professional photographer or a social media enthusiast, these presets provide an easy and efficient way to create polished, visually striking images.
By transforming your photo’s background into a smooth, blurred effect—often with a beautiful blue tone—you can make your subject pop, add depth, and give your images a professional, cinematic appearance. The simplicity of these presets allows you to enhance your photo with just one click, turning an average shot into a masterpiece in seconds.