

Today, I’m thrilled to present a set of Classic Blur Lightroom Presets that will elevate your photo editing experience. We’ve received an overwhelming number of requests for high-quality, user-friendly Lightroom presets, and it brings me great joy to fulfill that demand with this incredible preset.
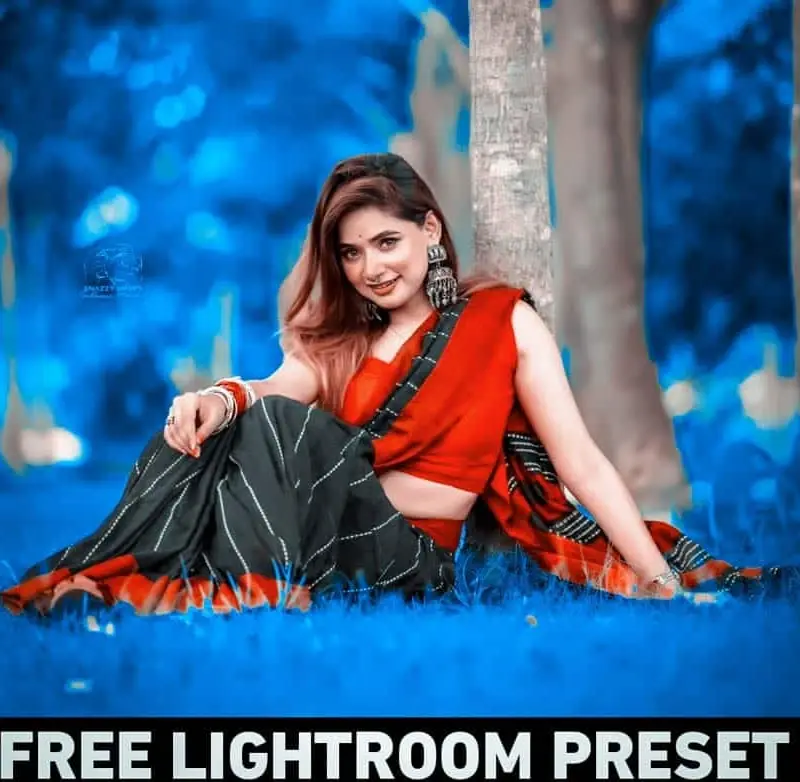
This Classic Blur preset is designed to give your images a soft, beautiful blurred blue background effect with just a single click. It’s perfect for creating professional-looking photos that showcase a unique, dreamy aesthetic. Whether you’re a beginner or an experienced editor, this preset makes it easy to add that signature blurred effect that is so popular in modern photography. The best part? These presets are available for free, and they can be seamlessly used on your mobile device for ultimate convenience.
If you’re new to the world of Lightroom Presets, don’t worry at all! I’ll walk you through a detailed, step-by-step guide on how to use them effectively. It’s a simple process that will enhance your workflow, save time, and help you achieve stunning results. By the end of this article, you’ll have all the knowledge you need to get the most out of this preset and make your photos truly stand out.
Be sure to read through the entire guide to ensure you’re making the most of this incredible preset, and get ready to transform your photos with ease. Happy editing!
What are Classic Blur Lightroom Presets?
Classic Blur Lightroom Presets are expertly crafted, predefined settings that allow you to effortlessly add a soft blur effect to the background of your photos. These presets come with a unique blue tone, which adds a calming and cinematic touch, enhancing your images with just a single click.
The main appeal of the Classic Blur preset lies in its ability to create a striking contrast by blurring the background while keeping the subject of the photo in sharp focus. This technique helps your subject stand out, making the image appear more professional and artistically enhanced. The addition of the blue hue further contributes to an elegant, refined aesthetic, giving your photos a cool, soothing vibe.
These presets are especially beneficial for photographers, influencers, or anyone looking to improve their photos quickly and efficiently. With Classic Blur presets, you can avoid the time-consuming manual adjustments typically required to achieve a blurred background. Instead, you can achieve a polished, cohesive look that complements your overall photo editing style. Perfect for those who want professional results in less time!
How to Download Classic Blur Lightroom Presets
Downloading the Classic Blur Lightroom Presets is an easy process. Follow these steps to get the preset on your device:
Step 1: Visit the Website
Go to the website offering the Classic Blur Lightroom Presets for download. These presets are often available on photography or editing blogs or preset download pages dedicated to Lightroom resources.
Step 2: Locate the Download Link
Once you’re on the site, look for the section where the Classic Blur Lightroom Presets are offered. You should find a clear download button or link.
Step 3: Click the Download Button
Click on the download button. Depending on the site, you may be asked to sign up or provide an email address in exchange for the download link. Some presets are available for free, while others may require a small fee.
Step 4: Save the File
Once you click the download link, the preset file will be saved to your device. It will typically be in a .zip format containing the preset files.
Step 5: Extract the Files
If the preset is in a .zip folder, open it and extract the files. You should find the Lightroom preset files, typically in .xmp or .lrtemplate format.
Step 6: Import the Presets into Lightroom
To use the preset, follow these simple steps based on your device:
- On Desktop:
Open Lightroom, navigate to the Develop module, and locate the Presets panel on the left side. Right-click in the panel and select Import. Choose the preset files you saved and click Import. - On Mobile:
Open the Lightroom app, tap on the Presets option, and tap the three dots in the corner. Select Import and locate the preset files to import them.
Step 7: Apply the Classic Blur Preset
Once the preset is imported, you can apply it to your photos by selecting it from your presets list. The Classic Blur effect will immediately be applied, creating a stunning blue-toned blurred background.
That’s it! You can now start editing your photos with the new Classic Blur Lightroom Preset. Enjoy the editing process and the transformation of your images!
For Lightroom Desktop (Classic or CC Version)
- Open Lightroom
Launch Adobe Lightroom on your desktop or laptop. Ensure that you are using either Lightroom Classic or Lightroom CC. - Import Your Photo
In the Library module, click on Import at the bottom left corner.
Select the photos you wish to edit and click Import again. - Access the Develop Module
Once your photo is imported, switch to the Develop module by clicking Develop at the top right of the screen. - Locate the Presets Panel
On the left side of the Develop module, you will find the Presets panel. If it’s not visible, click the triangle next to Presets to expand it. - Import the Preset (if you haven’t already)
Right-click anywhere in the Presets panel and select Import.
Navigate to the folder where your preset files are saved (these might be in .xmp or .lrtemplate format).
Select the preset files and click Import. - Apply the Preset
Browse through the presets listed in the Presets panel and click on the one you want to apply to your photo.
Lightroom will automatically adjust your photo based on the preset settings (such as exposure, contrast, colors, etc.). - Fine-tune the Settings
Once the preset is applied, feel free to make additional adjustments if necessary. The preset serves as a great starting point, but you can fine-tune the settings in the right-hand panel to better suit your image. - Save the Edited Photo
When you’re satisfied with the edits, click File > Export to save the final image to your computer.
For Lightroom Mobile
- Download and Install Lightroom Mobile
Ensure that Adobe Lightroom is installed on your smartphone or tablet (it’s available for free on both iOS and Android). - Import Your Photo
Open Lightroom Mobile and tap the Add Photos button to import your photo from your gallery or camera roll. - Access the Presets
In the editing panel, tap the Presets option at the bottom of the screen. - Import the Preset (if not already imported)
Tap the three dots in the top-right corner of the Presets panel.
Choose Import Presets and select the preset file (usually in .dng format) from your device.
The preset will be imported into Lightroom. - Apply the Preset
Browse through the list of available presets and tap on the one you wish to apply to your photo.
The preset will automatically adjust the photo’s appearance based on the settings it contains. - Adjust the Photo
If necessary, fine-tune the adjustments using the sliders for exposure, contrast, and other settings to get the desired look. - Save or Share Your Photo
Once you’re satisfied with the edits, tap the Share icon in the upper-right corner to export or share your image.
Tips for Using Lightroom Presets:
- Experiment with Multiple Presets: Try different presets until you find the one that best suits your photo.
- Use Presets as a Starting Point: Presets offer a great starting point for editing, but always feel free to tweak the settings to match the unique qualities of each photo.
- Organize Presets: If you have numerous presets, consider organizing them into folders for easy access.
By utilizing Lightroom presets, you can save valuable time and achieve professional-quality results for your photos.
Frequently Asked Questions
What are Classic Blur Lightroom Presets?
Classic Blur Lightroom Presets are pre-configured settings designed to create a blurred background effect with a soothing blue tone. These presets instantly elevate your photos, adding a cinematic or artistic feel with minimal effort. They’re perfect for focusing attention on the main subject while softening the surrounding background with a beautiful blur.
Can I use Classic Blur Lightroom Presets on my phone?
Yes! You can apply these presets on Lightroom Mobile. After downloading the preset (usually in .dng format), simply import it into the mobile version of Lightroom. Once imported, you can apply it directly to your photos on your phone for quick and professional edits.
Are Classic Blur Lightroom Presets free to download?
Some versions of Classic Blur Lightroom Presets are free to download, while others may be premium or paid. Be sure to check the source or website from where you’re downloading the presets to confirm whether they’re offered for free or require a purchase.
Can I use Classic Blur Presets for all types of photos?
Classic Blur presets work wonderfully for portraits, outdoor photography, and product shots. However, they might not be ideal for every photo type. The blurred background and blue tone work best when the subject contrasts nicely with the blurred backdrop. For photos like landscapes or architectural shots, you may need to adjust the settings for better results.
Can I create my own preset after using the Classic Blur Preset?
Yes, you can! After applying the Classic Blur preset and fine-tuning the adjustments, you can save the edited settings as a new custom preset. On the Desktop version, go to the Develop module, click the + icon under the Presets panel, and select Create Preset. You can then name your preset and use it in the future.
Can I use Classic Blur Presets for social media photos?
Absolutely! Classic Blur Lightroom Presets are ideal for creating eye-catching images for social media platforms like Instagram, Facebook, and Pinterest. The blurred blue background and sharp focus on the subject make your photos visually striking, which can help attract more attention from your followers.
Conclusion
Classic Blur Lightroom Presets offer an easy, effective way to transform your photos by adding a soft blur and a beautiful blue hue to the background. They save time while enhancing your photos with a cinematic or artistic effect that stands out. Whether you’re a beginner or an experienced photographer, these presets are a quick solution for achieving professional-level edits without the need for complex adjustments.
With the flexibility to adjust intensity and use them on various types of photos, these presets ensure consistent and visually appealing results. Available for both Lightroom Desktop and Mobile, Classic Blur presets are versatile tools for anyone looking to streamline their editing process and improve their photo quality.