

Greetings, everyone! I hope this message finds you well and in great spirits. Today, I am thrilled to introduce you to an exciting new editing tool—the Dark Brown and Aqua Lightroom Preset—designed to elevate your photos with a distinctive and stylish touch. If you are passionate about photography and love enhancing your images with beautifully curated presets, this one is an absolute must-have for your collection.
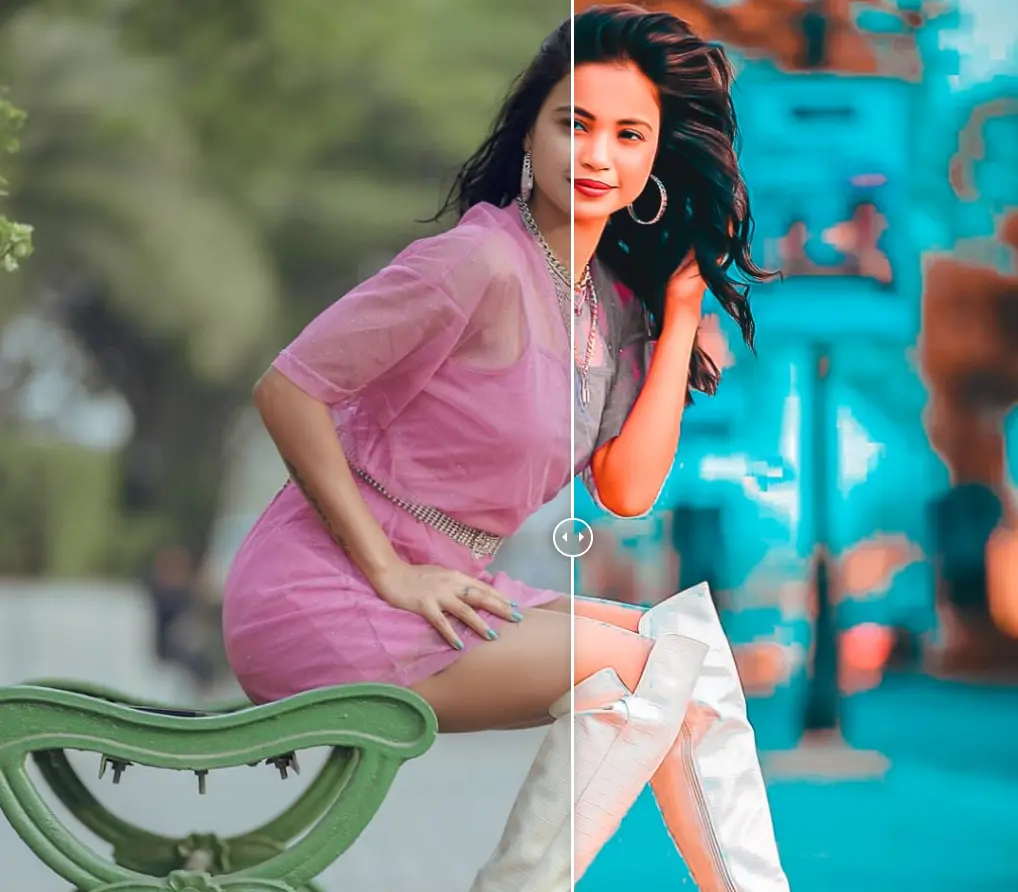
With this preset, you can effortlessly transform even the most ordinary photos into stunning, professional-quality visuals in just a few clicks. The Dark Brown and Aqua Preset enhances your images by adding rich, warm brown tones while balancing them with refreshing aqua hues, creating a visually striking effect. Whether you’re working on travel photography, lifestyle shots, or portrait edits, this preset will bring out depth, contrast, and artistic appeal in your photos, making them look polished and aesthetically pleasing.
In this comprehensive guide, I’ll walk you through the simple steps to download and apply this preset in Lightroom, ensuring that you can make the most of its creative potential. Whether you’re a beginner or an experienced photo editor, you’ll find the process incredibly easy and rewarding. If you encounter any difficulties during the download or installation, please feel free to leave a comment below, and we’ll be more than happy to assist you with any issues.
Stay tuned as we dive into the editing process and explore how this preset can take your photography to the next level!
About the Lightroom App?
Lightroom is a powerful and highly acclaimed photo editing application developed by Adobe, revolutionizing the way professionals and enthusiasts enhance their images. With its intuitive interface and professional-grade editing tools, Lightroom allows users to create visually stunning photos effortlessly. One of its most distinctive features is the ability to apply high-quality edits directly from a mobile device, making it a top choice for photographers and content creators on the go.
One of the standout capabilities of Lightroom is its seamless use of presets, enabling users to enhance their images with a single click. Unlike many other editing apps, Lightroom ensures that your photo’s original quality is preserved, delivering high-resolution results without any loss in detail. Whether you are making quick adjustments or diving deep into advanced edits, Lightroom offers an unparalleled level of precision to refine your visuals.
Lightroom App All Tools:
Adobe Lightroom provides a comprehensive suite of tools that cater to both beginners and professionals. These tools are designed to help you perfect your images with precision and ease:
- Auto Tool – A one-click enhancement feature that automatically adjusts the exposure, contrast, and brightness of your image, offering an excellent starting point for further refinements.
- Light Tool – Adjust exposure, brightness, shadows, and highlights manually, allowing you to fine-tune your image’s lighting for a well-balanced composition.
- Color Tool – Achieve precise color correction by tweaking hue, saturation, and luminance to create a vibrant, natural, or artistic color palette.
- Effect Tools – Add depth and texture to your photos with tools like clarity, dehaze, grain, and vignettes, enhancing the overall mood and tone of your image.
Additional Advanced Tools:
Beyond its core editing features, Lightroom also includes several specialized tools to take your editing to the next level:
- Detail Tool – Enhance the sharpness and reduce noise to refine image clarity.
- Optics Tool – Fix lens distortion and chromatic aberration, ensuring clean and crisp visuals.
- Geometry Tool – Correct image perspective, straighten lines, and adjust distortions caused by camera angles.
- Healing Tool – Remove unwanted blemishes, spots, or distracting objects from your photos for a flawless finish.
- Crop & Straighten Tool – Adjust composition by cropping, rotating, and aligning your image perfectly.
- Masking Tool – Apply precise adjustments to specific areas of an image, allowing you to highlight or soften details selectively.
These features, combined with Lightroom’s intuitive design and powerful AI-powered adjustments, make it an essential tool for anyone looking to elevate their photography. Whether you’re a beginner exploring creative editing or a professional aiming for high-quality retouching, Lightroom provides everything you need to transform your photos into works of art.
How to Use Presets in the Lightroom Mobile App
Using presets in the Lightroom mobile app is one of the easiest ways to enhance your photos and achieve professional-quality edits with minimal effort. Whether you’re a beginner or an experienced editor, presets help you apply consistent and stunning color tones to your images. Here’s a step-by-step guide on how to apply presets in Lightroom Mobile:
1. Download and Import the Preset
Before applying a preset, you need to download it onto your device. Most presets come in .DNG format, which Lightroom recognizes as a special image file.
- Open the Lightroom mobile app.
- Tap the “+” button to create a new album or select an existing one.
- Import your photo by selecting an image from your gallery or camera roll.
2. Import the Preset (If Applicable)
If the preset is not already available in Lightroom, you need to add it manually.
- Tap the “+” icon and choose Add Photos.
- Locate the .DNG preset file on your device.
- Select the preset file, and it will appear as an image inside Lightroom.
3. Create and Save the Preset
To save the preset for future use, follow these steps:
- Open the imported preset image (DNG file) in Lightroom.
- Tap the three-dot menu (top-right corner) and select Create Preset.
- Name your preset and select which settings you want to include (e.g., color, exposure, contrast).
- Tap Save, and the preset will be stored in your Lightroom preset library.
4. Apply the Preset to Your Photos
Now that your preset is saved, applying it to any photo is simple:
- Open the photo you want to edit.
- Tap the Presets tab (represented by the magic wand icon at the bottom of the screen).
- Scroll through your saved presets and select the one that best suits your image.
- Once applied, the preset will automatically adjust the photo’s settings, such as color balance, brightness, exposure, and contrast, giving your image a professional look.
5. Fine-Tune for a Personal Touch (Optional)
Although presets offer a quick and effective way to edit photos, you may want to make some manual adjustments to achieve your desired look.
- Use tools like Light, Color, or Effects to fine-tune the image.
- Adjust brightness, contrast, saturation, and shadows to enhance the final result.
6. Save and Export Your Edited Photo
Once you’re satisfied with the edit:
- Tap the checkmark to confirm the changes.
- To save your image, tap the Share icon (top-right corner).
- Choose Export to save the final image to your gallery or share it on social media platforms.
Why Use Lightroom Presets?
Presets are a game-changer for anyone looking to streamline their editing workflow while achieving consistent, high-quality results. Here are some benefits of using Lightroom presets:
✅ Free to download – Many presets are available at no cost.
✅ Premium color tones – Create a unique aesthetic for your photos.
✅ Compatible with the Lightroom Mobile app – No desktop software required.
✅ No bugs or glitches – Smooth performance across devices.
By following this guide, you can easily apply and customize presets in the Lightroom mobile app, allowing you to enhance your photos like a pro with just a few taps! 🎨✨
How to Download Dark Brown and Aqua Preset for Lightroom
Downloading the Dark Brown and Aqua Lightroom preset is simple and hassle-free. Follow these steps to get started:
- Scroll down to find the download link for this preset.
- Click the download button to access the preset file.
- Once the download is complete, the preset will be saved to your device and ready for use in Lightroom.
Now, you’re all set to apply these amazing Dark Brown and Aqua presets to your photos!
How to Use Dark Brown and Aqua Preset in Lightroom
To apply the Dark Brown and Aqua Lightroom preset to your images, follow these quick and easy steps:
1️⃣ Download the preset by clicking on the download option below.
2️⃣ Open the Lightroom mobile app and import the preset by tapping the “Add Photo” option.
3️⃣ Once the preset is opened, tap the three-dot menu (top-right corner) and select Copy Settings.
4️⃣ Tap the checkmark (✔) at the top to confirm.
5️⃣ Go back to your original photo and select it.
6️⃣ Tap the three dots again and choose Paste Settings.
7️⃣ Your photo will now have the same beautiful Dark Brown and Aqua color tones, completing your editing process!
Enjoy creating stunning edits with the Dark Brown and Aqua preset, and take your photos to the next level! 🌿🎨✨
Frequently Asked Questions
What is the Dark Brown and Aqua Lightroom preset?
The Dark Brown and Aqua preset is a specially designed filter that enhances your photos by combining warm, earthy brown tones with vibrant aqua highlights. It creates a visually striking effect, adding depth and richness to your images. This preset is perfect for photographers and content creators looking to give their pictures a dramatic, stylized, and professional touch.
How do I install the Dark Brown and Aqua preset in Lightroom Mobile?
Installing the preset is quick and easy:
1️⃣ Download the .dng file from the provided link.
2️⃣ Open the Lightroom Mobile app and import the preset file.
3️⃣ Tap the three-dot menu in the top-right corner and choose Create Preset.
4️⃣ Give your preset a name and save it.
5️⃣ Now, you can apply it to any of your photos with a single tap.
Can I use this preset for all types of photos?
Yes! The Dark Brown and Aqua preset works well with a variety of images, including:
✅ Outdoor photography – enhances nature, landscapes, and travel photos.
✅ Portraits – adds warmth and a cinematic touch.
✅ Creative edits – perfect for artistic and conceptual photography.
However, depending on the lighting and color of your original photo, you may need to adjust exposure, brightness, or contrast to achieve the best result.
Is this preset free to download?
Yes! The Dark Brown and Aqua Lightroom preset is completely free to download and use.
Will this preset work on both iOS and Android devices?
Absolutely! This preset is fully compatible with the Lightroom Mobile app on both iOS and Android devices.
Can I adjust the preset after applying it?
Yes! After applying the preset, you can fine-tune the settings using Lightroom’s tools. You can modify:
🎨 Exposure – to lighten or darken your image.
🎨 Contrast – for a more dramatic effect.
🎨 Saturation – to enhance or mute the colors.
🎨 Shadows & Highlights – to refine the details in your image.
Are there any bugs with this preset?
No, this preset is bug-free and designed to work smoothly within the Lightroom Mobile app.
How do I use the preset on multiple photos?
Once you’ve saved the Dark Brown and Aqua preset, you can easily apply it to multiple images by:
1️⃣ Selecting a new photo.
2️⃣ Tapping Presets at the bottom of the screen.
3️⃣ Choosing the Dark Brown and Aqua preset from your saved collection.
4️⃣ Adjusting any additional settings if needed.
Conclusion
The Dark Brown and Aqua Lightroom preset is an incredible tool for enhancing your images with a unique blend of rich, warm tones and vibrant aqua highlights. Whether you’re an amateur or a professional photographer, this preset offers a simple and effective way to achieve stunning, professional-quality edits.
✅ Easy to use – Just download, install, and apply in one click.
✅ Compatible with both iOS and Android – Works seamlessly across all mobile devices.
✅ Completely free – No hidden costs or premium upgrades.
✅ Perfect for social media, branding, and artistic edits – Elevate your content instantly!
With just one click, you can transform any photo into a beautiful, eye-catching masterpiece. Give it a try today and take your photography to the next level! 🚀✨