

Welcome to Our Video Editing Tutorial!
Whether you’re a beginner stepping into the world of video editing or an experienced creator looking to refine your skills, this comprehensive guide will equip you with the essential techniques and advanced strategies needed to craft high-quality, visually compelling content. Video editing is more than just assembling clips—it’s about storytelling, creativity, and technical precision. By mastering the right tools and methods, you can transform raw footage into a polished masterpiece that captivates your audience.
From cutting and trimming clips to seamlessly integrating transitions, effects, and sound, this tutorial will take you through every crucial step of the editing process. You’ll learn how to enhance video flow, adjust color grading for a professional touch, and incorporate audio elements that add depth and emotion to your projects. Whether you’re editing for social media, film, or personal projects, the ability to shape your narrative with precision is a valuable skill in today’s digital landscape.
Video editing not only refines the visual appeal of your content but also strengthens its impact, making it more engaging and immersive. With the right software, techniques, and creative approach, you’ll unlock endless possibilities for storytelling. Let’s dive into the world of video editing and start bringing your creative vision to life with confidence and finesse!
Understanding the Basics of Video Editing
Before diving into any video editing software, it is crucial to grasp the fundamental concepts that form the backbone of the editing process. Mastering these basics will help you navigate the software efficiently and develop a strong foundation for creating visually appealing, well-structured videos. Below are some key terms and essential ideas every video editor should know:
- Timeline: The timeline is the workspace where all the elements of your video—clips, audio, effects, and transitions—are arranged in a structured sequence. It serves as the core editing area, allowing you to adjust the duration, placement, and order of your media elements to craft a cohesive final product.
- Cutting/Trimming: This involves removing unwanted portions of footage or shortening clips to enhance the flow of your video. Proper cutting and trimming ensure that your content remains engaging, concise, and aligned with your storytelling goals.
- Transitions: These are visual effects used to create smooth shifts between clips, preventing abrupt jumps. Common transitions include fades, dissolves, wipes, and slides, each serving a unique purpose in maintaining the visual continuity of your video.
- Effects: Special visual enhancements such as color grading, slow motion, motion blur, and filters can be applied to footage to create a specific mood or style. Effects can significantly elevate the overall quality and impact of your video when used appropriately.
- Audio Editing: Sound is an integral part of any video. Adjusting audio levels, eliminating background noise, adding voiceovers, or incorporating background music and sound effects can enhance the auditory experience and evoke emotions in your audience.
Understanding these foundational elements is essential for achieving professional-quality video edits. By mastering these concepts, you’ll be well-equipped to create visually compelling and well-structured videos that capture your audience’s attention.
How Do I Start Learning Video Editing?
Embarking on your video editing journey can feel overwhelming at first, but with the right approach, you can build your skills progressively. Video editing is a dynamic and ever-evolving craft, so continuous learning is key to mastering new techniques and refining your workflow. Here are some effective ways to get started:
- Software Walkthroughs & Tutorials
A great first step is to explore the built-in learning resources available within your chosen video editing software. Many professional editing tools, such as Adobe Premiere Pro, Final Cut Pro, and DaVinci Resolve, offer guided tutorials, interactive walkthroughs, and documentation to help users understand the interface and core functionalities. These resources provide a structured introduction, ensuring that you gain confidence in navigating the software efficiently. - YouTube Videos
YouTube serves as an extensive and accessible learning platform for aspiring video editors. Countless experienced professionals and content creators share free, high-quality tutorials covering a broad range of topics—from beginner-friendly guides to advanced editing techniques. Whether you’re looking for step-by-step instructions, creative editing tips, or breakdowns of specific effects, YouTube offers an endless supply of valuable content suitable for all skill levels. - Masterclasses
For those seeking a more in-depth and structured learning experience, investing in online masterclasses or accredited courses can be highly beneficial. Platforms such as Udemy, Skillshare, and Coursera provide comprehensive video editing courses taught by industry professionals. These courses often include hands-on projects, detailed explanations of advanced features, and real-world editing scenarios, making them ideal for those looking to build professional expertise. - Learn as You Go
One of the most effective ways to develop your video editing skills is through hands-on practice. By experimenting with your own footage and working on real projects, you can learn from trial and error while discovering the techniques that work best for your creative style. This approach encourages problem-solving, fosters creativity, and allows you to apply theoretical knowledge in a practical setting. While it may take time to refine your skills, continuous practice will enable you to develop a unique editing style and a more efficient workflow.
Regardless of the learning method you choose, remember that video editing is an ongoing process of exploration and improvement. Each project you complete brings new opportunities to experiment with different techniques, refine your storytelling abilities, and enhance the overall quality of your work. With dedication and persistence, you’ll steadily progress toward creating polished, professional-level videos that leave a lasting impact.
Choosing the Right Video Editor
Selecting the right video editing software is a crucial step in your creative journey, especially if you are just starting out. With a wide range of options available, from beginner-friendly programs to professional-grade editing suites, making the right choice can significantly impact your workflow, efficiency, and overall editing experience. To help you find the best video editor for your needs, consider the following key factors:
- Budget
Your budget is one of the most important considerations when selecting a video editor. There are powerful video editing tools available for every price range, from free software with essential features to high-end professional programs packed with advanced capabilities. While premium editors like Adobe Premiere Pro, Final Cut Pro, and DaVinci Resolve Studio offer industry-standard tools for professional filmmakers and content creators, many free or affordable alternatives, such as HitFilm Express, Shotcut, and iMovie, provide excellent editing functionality for beginners. If you’re just starting, consider beginning with free software to gain experience before investing in a paid editor that aligns with your long-term needs. - Target Audience
It’s natural to want the most advanced video editing software available, but for beginners, opting for an overly complex editor can be overwhelming. Professional-grade editors often come with a steep learning curve and a vast array of features that may not be necessary for simple projects. Instead, selecting a beginner-friendly video editor—such as Filmora, Movavi, or iMovie—can streamline the learning process, allowing you to focus on mastering essential editing skills without unnecessary complications. As you progress and gain confidence, transitioning to a more advanced editor will be much easier. - Compatibility
Before committing to a video editor, ensure it is compatible with your computer’s operating system and hardware specifications. Some editing programs, such as Final Cut Pro, are exclusive to macOS, while others, like Windows Movie Maker, are designed solely for Windows. Additionally, high-performance video editing software often requires powerful hardware, including a fast processor, ample RAM, and a capable graphics card. Checking the system requirements in advance will help you avoid performance issues and ensure a smoother editing experience. - Features
Different video editors come with various feature sets, so it’s essential to evaluate the tools and capabilities each software offers. Think about the type of videos you plan to create and ensure the software supports your needs. For example:- If you’re editing content for YouTube, look for features such as easy trimming, drag-and-drop transitions, text overlays, and built-in export options for social media platforms.
- If you’re working on professional film projects, seek advanced tools like multi-camera editing, motion tracking, color grading, and high-resolution rendering support.
- For short-form content like Instagram Reels or TikTok videos, opt for software that includes quick editing features, built-in templates, and user-friendly animation tools.
A well-chosen video editor will not only support your current projects but also provide room for growth as you develop your skills and explore more advanced techniques.
By carefully considering your budget, skill level, software compatibility, and the features you require, you can confidently choose a video editing program that aligns with both your creative vision and technical needs. Making the right choice from the beginning will help you build a strong foundation in video editing, allowing you to bring your ideas to life with efficiency and professionalism.
Video Editing Tutorial: Editing Basics
Mastering the fundamentals of video editing is essential for creating professional and engaging content. Whether you’re producing short social media clips, vlogs, or cinematic videos, understanding basic editing techniques will help you enhance your storytelling and elevate the overall quality of your projects. Below, we’ll explore key aspects of video editing that contribute to a polished final product.
Trimming
Trimming is one of the most fundamental editing techniques, allowing you to refine your footage by adjusting the start and end points of a video clip. This process helps eliminate unnecessary or irrelevant moments, ensuring that only the most essential and engaging parts of your footage remain. Most video editing software provides an intuitive trimming tool that lets you precisely control the length of each clip. Effective trimming is crucial for maintaining a smooth flow, improving pacing, and keeping your audience engaged from start to finish.
Transitions
Transitions play a significant role in maintaining continuity between clips, making your video feel more seamless and visually appealing. Without transitions, abrupt cuts between clips can feel jarring and disrupt the storytelling flow. Most video editing programs offer a variety of pre-set transitions, such as cross-fades, dissolves, wipes, and jump cuts, each serving different purposes depending on the mood and style of your video. Choosing the right transition technique enhances the viewer’s experience by creating smooth, natural progressions from one scene to another. While transitions can add a professional touch, they should be used thoughtfully to avoid overuse, which can make the video feel cluttered or distracting.
Music & Sound Effects
Audio is a powerful element in video editing that can evoke emotions, set the tone, and add depth to your storytelling. Incorporating background music and sound effects enhances specific moments and improves the overall production quality. Many video editing software programs provide built-in music and sound effect libraries, allowing you to browse and select tracks that complement your content. When adding music, ensure that the volume levels are balanced so that it does not overpower dialogue or important sound cues. Sound effects, such as ambient noise, footsteps, or cinematic hits, can also make your video feel more immersive and engaging. Always choose royalty-free or licensed music to avoid copyright issues when publishing your content.
Voice-over
A voice-over is a recorded narration that plays over the video, often used to provide context, explain key points, or add a personal touch to the content. Voice-overs are especially useful in tutorials, documentaries, and promotional videos where clear communication is essential. Typically, voice-overs are recorded separately using a microphone and then synced with the relevant visuals during post-production. To achieve professional-sounding narration, record in a quiet environment, use a high-quality microphone, and ensure proper pacing and clarity in your speech. Editing software allows you to enhance voice-over recordings by adjusting volume levels, removing background noise, and fine-tuning the audio for a polished result.
Audio Editing
High-quality audio is just as important as crisp visuals in video production. Poor audio quality can make even the most well-shot video feel unprofessional. Audio editing involves refining the sound by removing background noise, normalizing volume levels, and ensuring clarity. Many editing programs provide tools for reducing unwanted sounds like hissing, echoes, or sudden spikes in volume. Proper audio mixing ensures that dialogue, background music, and sound effects blend harmoniously without any single element overpowering the others. If necessary, use equalization (EQ) and compression to enhance vocal clarity and achieve a balanced audio mix.
Color Correction and Grading
Visual consistency and color enhancement are crucial for making your video aesthetically appealing. There are two key processes involved in adjusting a video’s color:
- Color Correction: This is the technical process of adjusting the color balance, exposure, contrast, saturation, and white balance of your footage to achieve a natural and uniform look. It ensures that all clips maintain consistent brightness and color accuracy, correcting any discrepancies caused by different lighting conditions or camera settings. Tip: Apply color correction across all your clips before moving on to more creative color adjustments to maintain uniformity throughout the video.
- Color Grading: After color correction, color grading allows you to creatively enhance the mood and tone of your video. This process involves adjusting hues, applying cinematic filters, or manipulating the overall color temperature to achieve a specific style. For example, a warm, golden tone can create a nostalgic atmosphere, while a cool, desaturated palette might evoke a dramatic or moody feel. Many professional video editors use LUTs (Lookup Tables) to apply predefined color grades quickly, ensuring a cinematic and cohesive look across the entire project.
Mastering these essential video editing techniques will not only improve the visual and auditory quality of your content but also elevate your storytelling ability. Whether you’re producing content for social media, film, or personal projects, understanding these core editing principles will help you create compelling videos that captivate your audience.
Adding Text and Lower Thirds
Text elements and lower thirds are essential tools in video editing that help convey information, reinforce key messages, and enhance viewer engagement. Whether you’re adding titles, subtitles, or call-to-action (CTA) prompts, text overlays can make your video more informative and visually appealing.
Customizing text in your video editor allows you to adjust the font style, size, color, and positioning to match your video’s overall aesthetic. Many editing programs offer pre-designed text templates, but you can also create unique, branded text overlays for a more personalized touch. A specific type of text overlay, known as a lower third, is commonly used in news reports, interviews, and documentary-style videos. Positioned in the lower section of the screen, lower thirds provide additional details such as a speaker’s name, job title, or location, helping viewers quickly grasp essential context without disrupting the visual flow.
Effects
Applying visual effects during post-production can significantly enhance the overall impact of your video. Effects can range from subtle refinements, such as stabilizing shaky footage to ensure smooth playback, to more dramatic enhancements like slow-motion sequences, time-lapses, or dynamic motion graphics. These effects can emphasize key moments, add artistic flair, or even correct issues that occurred during filming.
When used strategically, effects can elevate the production value of your content. However, excessive or unnecessary effects can make a video feel cluttered or unprofessional. The key to effective editing is maintaining a balance—using effects to complement the storytelling rather than overshadow it. Most video editing software provides built-in libraries of effects, allowing you to experiment with different styles and techniques to find what best suits your project.
Captions and Subtitles
Adding captions and subtitles to your video is an effective way to improve accessibility and broaden your audience reach. Captions and subtitles ensure that viewers who are hard of hearing or watching without sound can still follow along. Additionally, they contribute to better SEO performance by making your video more discoverable through search engines.
Creating captions and subtitles typically involves generating a transcript of your video’s audio. Many video editing programs offer automatic transcription features, or you can use third-party tools to convert speech into text. Once you have a transcript, you can format it as either captions or subtitles, depending on your audience’s needs.
Here’s the distinction between the two:
- Captions provide a complete transcription of all audio elements in a video, including spoken dialogue, background noises, and sound effects. They are designed for viewers who are hard of hearing and require full audio descriptions.
- Subtitles focus exclusively on spoken dialogue and are often used for translating videos into different languages. Unlike captions, they do not include descriptions of non-verbal sounds, making them less comprehensive for accessibility purposes.
Captions and subtitles can be incorporated into your video in two ways:
- Open captions are embedded directly into the video file, making them a permanent feature that cannot be turned off.
- Closed captions are separate text files that allow viewers to toggle them on or off as needed, providing greater flexibility in how they are displayed.
By including captions or subtitles, you can make your content more inclusive while also increasing engagement, as many social media users prefer to watch videos without sound.
Exporting and Formats
Once you have completed your editing process, the final step is exporting your video in the appropriate format. Exporting determines the final quality and compatibility of your video across different platforms and devices. To ensure the best possible output, selecting the right file format and compression settings is crucial.
Most video editing software allows you to export in popular formats such as MP4, MOV, and AVI. The format you choose depends on the intended use of the video:
- MP4 is the most widely supported format and is ideal for online platforms like YouTube, Instagram, and Facebook due to its efficient compression and high-quality output.
- MOV is commonly used for high-quality video playback and editing, particularly within Apple’s ecosystem.
- AVI is an older format that maintains high quality but results in larger file sizes, making it less ideal for web streaming.
For advanced users looking to optimize their export settings, software like Adobe Media Encoder and Apple Compressor offers fine-tuned controls over bitrate, resolution, frame rate, and compression. Adjusting these settings ensures that your video maintains visual and audio quality while keeping file sizes manageable for faster uploads and smoother playback.
If you’re new to video editing, don’t hesitate to explore additional resources and tutorials to refine your skills further. Mastering the art of exporting will ensure your videos are crisp, professional, and ready for sharing across multiple platforms.
Riverside Video Editor Tutorial for Beginners
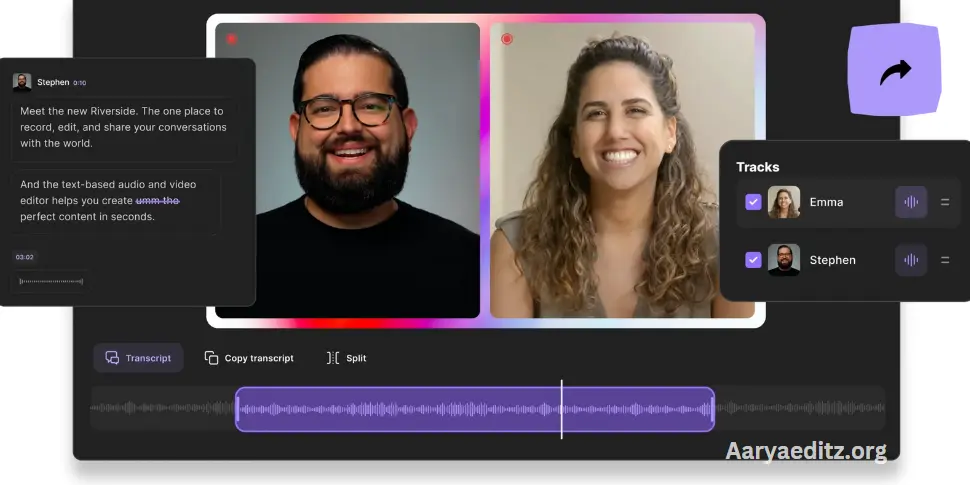
If you’re looking for an easy and efficient way to edit videos without diving into a complex editing suite, Riverside provides a user-friendly solution tailored for both beginners and professionals. Unlike traditional video editing software that requires downloading and installation, Riverside enables you to edit directly within its platform, streamlining your workflow and saving valuable time. Whether you’re producing podcasts, interviews, or marketing content, Riverside’s intuitive approach simplifies the editing process without compromising quality.
One of the standout features of Riverside is its text-based video editor, which allows you to edit your video just as easily as you would edit a text document. This feature is powered by AI-generated transcriptions, making it incredibly simple to refine your footage. Instead of manually scrubbing through the video timeline, you can search for specific words or phrases within the transcript, instantly locating key moments in your recording. Deleting unwanted sections is effortless—simply remove the corresponding text in the transcript, and the video and audio will be trimmed accordingly.
Once you have finalized your cuts, you can further enhance your video by incorporating captions for improved accessibility and engagement. Customize their style, font, and positioning to match your branding or aesthetic preferences. Riverside also offers additional personalization options, allowing you to add custom backgrounds, logos, and overlays to create a polished, professional-looking video.
For audio enhancement, Riverside provides automated tools designed to optimize sound quality. You can remove background noise, eliminate long pauses or silences, and normalize audio levels to ensure a consistent listening experience. These features are particularly useful for content creators who want to maintain high production quality without needing advanced audio editing skills.
Beyond basic editing, Riverside also helps maximize the reach and impact of your content through its Magic Clips tool. This AI-powered feature enables you to create multiple short-form videos from a single recording effortlessly. Ideal for social media marketing, Magic Clips automatically identifies key highlights in your video and transforms them into shareable, bite-sized clips. You can further refine these clips or export them directly for use on platforms like Instagram, TikTok, and YouTube Shorts, helping to increase audience engagement and drive traffic to your main content.
Key Features of Riverside Video Editor:
- Text-Based Video Editing: Make precise cuts effortlessly by editing a transcript, eliminating the need for complex timeline navigation.
- AI-Generated Transcriptions: Highly accurate transcripts available in over 100 languages, allowing for easy content editing and searchability.
- Seamless Navigation: Quickly locate specific moments in your video using text search instead of manually rewatching footage.
- Magic Clips Creator: AI-powered tool that detects key highlights in your video and converts them into short, engaging clips perfect for social media.
- Customization and Branding: Add personalized backgrounds, logos, and custom layouts to create a professional and branded visual experience.
- Automated Audio Enhancement: Built-in tools for noise reduction, silence removal, and audio normalization ensure high-quality sound output.
- AI-Powered Speaker View: Intelligent auto-switching between speakers, cutting between participants just before they speak for a dynamic viewing experience.
With Riverside, video editing becomes a more accessible, streamlined, and efficient process. Whether you’re a beginner looking for a simple way to refine your recordings or a professional seeking a time-saving editing solution, Riverside’s AI-powered tools provide an intuitive experience that enhances both workflow and content quality—without the need for complicated software.
Tips for Improving Your Video Editing Skills
Mastering video editing is a continuous learning process that requires patience, creativity, and dedication. Whether you’re a beginner or looking to refine your techniques, the key to improving your skills lies in consistent practice, learning from experienced professionals, and staying organized. Below are some essential tips to help you sharpen your editing abilities and enhance the quality of your videos.
Practice, Practice, Practice
The most effective way to improve your video editing skills is through hands-on experience. The more you edit, the more you’ll develop a natural sense of pacing, storytelling, and technical proficiency. Try experimenting with different types of videos, such as vlogs, interviews, cinematic sequences, and promotional content. Each format presents unique challenges and learning opportunities, allowing you to build a diverse skill set.
Recreating edits from professional videos can also be an excellent way to refine your technique. Analyze transitions, pacing, and effects used in high-quality productions, then attempt to replicate them in your own projects. Over time, you’ll develop a keen eye for detail and a deeper understanding of how to create compelling visual narratives.
Learn from Others
Video editing is an ever-evolving field, and one of the best ways to stay ahead is by learning from seasoned editors and industry professionals. Watching online tutorials, enrolling in masterclasses, and following expert content creators can expose you to new editing techniques, shortcuts, and best practices. Platforms like YouTube, Skillshare, and Udemy offer a wealth of free and paid courses covering everything from beginner basics to advanced post-production techniques.
Beyond tutorials, actively analyzing professional videos can be incredibly beneficial. Observe how pacing, color grading, and effects are used to enhance storytelling. Join video editing communities, forums, and social media groups where you can engage with fellow editors, seek feedback on your work, and gain insights into industry trends. By continuously learning from others, you can expand your creative toolkit and refine your own editing style.
Keep It Simple
As a beginner, it’s easy to get carried away with excessive effects, elaborate transitions, and overcomplicated edits. However, simplicity is often the key to creating professional-looking videos. Focus on mastering the fundamentals—clean cuts, smooth transitions, balanced audio, and coherent storytelling—before experimenting with complex visual effects.
A well-edited video prioritizes clarity and engagement over flashy effects. Instead of overloading your project with unnecessary elements, aim for a seamless flow that enhances the viewer’s experience. As you gain confidence, you can gradually incorporate more advanced techniques to elevate your work while maintaining a polished, professional aesthetic.
Stay Organized
A well-structured editing workflow can significantly improve your efficiency and productivity. Keeping your footage, audio files, and assets organized will save you time and reduce frustration during the editing process.
Here are some best practices for staying organized:
- Use folders and naming conventions – Categorize your files into folders such as “Raw Footage,” “Audio,” “Graphics,” and “Final Edits.” Consistent file naming prevents confusion and makes it easier to locate assets.
- Utilize editing software features – Most professional video editors allow you to tag, label, and color-code clips for better organization. Taking advantage of these tools can streamline your workflow.
- Back up your projects – Always save multiple copies of your work on external drives or cloud storage to prevent data loss. Unexpected crashes or corrupted files can set you back, so it’s crucial to have a reliable backup system.
By implementing these strategies, you’ll work more efficiently, reduce stress, and maintain a structured approach to editing, allowing you to focus on creativity rather than file management.
Improving your video editing skills takes time, patience, and a commitment to continuous learning. By practicing regularly, studying expert techniques, keeping your edits clean and professional, and maintaining an organized workflow, you’ll steadily enhance your abilities and create compelling, high-quality videos.
Frequently Asked Questions
What is the best video editing software for beginners?
The best video editing software for beginners depends on several factors, including ease of use, available features, and budget. If you’re a Mac user, iMovie is a fantastic starting point with its intuitive interface and essential editing tools. For Windows users, Windows Video Editor provides a simple yet effective way to edit clips and create engaging videos. If you’re looking for more advanced features without a price tag, DaVinci Resolve offers a free version packed with professional-grade tools, including color correction, visual effects, and motion graphics. These options are all beginner-friendly, making them great choices for anyone new to video editing.
Do I need to buy expensive software to start editing videos?
No, investing in costly software isn’t necessary when starting out with video editing. There are numerous free video editing programs available that offer robust functionality. Options like HitFilm Express, Lightworks, and DaVinci Resolve Free provide high-quality editing tools, allowing you to create professional-looking videos without spending a dime. As you advance and require more sophisticated features, you can consider upgrading to premium software such as Adobe Premiere Pro or Final Cut Pro, which cater to professional editors with advanced tools and effects. However, many free tools are sufficient for producing high-quality content.
How long does it take to learn video editing?
The time required to learn video editing varies based on factors such as prior experience, the complexity of the software, and the type of content you want to create. If you’re focusing on basic video editing techniques—such as trimming clips, applying transitions, and adjusting audio—you can grasp the fundamentals within a few hours to a few days. However, mastering advanced features like color grading, motion graphics, and visual effects may take weeks or even months of consistent practice. The key to improvement is hands-on experience—regularly working on projects, experimenting with different techniques, and learning from tutorials will significantly speed up the learning process.
What is the difference between a trim and a cut in video editing?
Both trimming and cutting are essential tools in video editing, but they serve different purposes. Trimming is the process of refining a video clip by adjusting its start and end points to remove unnecessary footage, ensuring that only the best moments are retained. Cutting, on the other hand, refers to the act of splitting or removing sections of a clip, whether at the beginning, middle, or end. Cutting allows you to rearrange scenes, remove unwanted parts, or create jump cuts for a more dynamic and engaging video.
Do I need a powerful computer to edit videos?
While having a high-performance computer can enhance the efficiency of your video editing workflow, it’s not an absolute requirement—especially for beginners working with basic edits. If you’re starting with simple tasks like trimming clips and adding text, a mid-range computer with at least 8GB of RAM and a decent processor should be sufficient. However, if you’re working with 4K footage, complex animations, or heavy effects, a high-end computer with a dedicated GPU, 16GB+ RAM, and a powerful processor is highly recommended for smooth performance. Investing in external storage or cloud backup solutions is also helpful, as video files can quickly consume disk space.
Can I add music and sound effects to my video?
Absolutely! Adding music and sound effects is a crucial element of video production, as it enhances the overall viewing experience by setting the tone, reinforcing emotions, and making your content more engaging. Most video editing software comes with built-in libraries of royalty-free music and sound effects, which can be used without worrying about copyright issues. You can also upload your own music and sound clips, but make sure to comply with copyright laws or use licensed or royalty-free tracks to avoid any legal complications.
How do I add captions or subtitles to my video?
Captions and subtitles make videos more accessible and engaging, improving reach for viewers who are deaf or hard of hearing, as well as those watching in sound-off environments. There are two main ways to add them to your video:
- Automatically Generated Captions: Many video editing programs, including Adobe Premiere Pro, Final Cut Pro, and DaVinci Resolve, have built-in speech-to-text tools that can automatically generate captions based on your audio. Online tools like Otter.ai and Rev.com can also create transcripts that can be imported into your editing software.
- Manual Captions and Subtitles: If you want more control over accuracy and timing, you can manually type out and sync captions within your editing software. Most programs allow you to customize the font, size, color, and placement for better readability.
Understanding the difference between captions and subtitles is also important:
- Captions provide a full textual representation of the video’s audio, dialogue, and sound effects, ensuring accessibility for those with hearing impairments.
- Subtitles display only spoken dialogue and are often used for translations in different languages.
Additionally, captions can be formatted in two ways:
- Open Captions: These are permanently burned into the video and cannot be turned off.
- Closed Captions: These are separate subtitle files that can be enabled or disabled based on viewer preference.
Should I learn color grading and effects as a beginner?
As a beginner, your main focus should be on mastering basic editing techniques, such as trimming, cutting, transitions, and audio balancing. However, color correction and grading can significantly enhance the visual appeal of your videos. Once you feel comfortable with fundamental editing skills, you can start exploring:
- Color Correction: Adjusting exposure, contrast, white balance, and saturation to achieve a consistent, natural look across all clips.
- Color Grading: Applying stylized effects to set a specific mood or aesthetic, such as a cinematic warm tone or a cool, dramatic look.
Similarly, while special effects like motion graphics and animations can add a professional touch, it’s best to gradually incorporate them into your workflow rather than overwhelming yourself in the early stages.
Conclusion
Video editing is a valuable and rewarding skill that can elevate your content, whether for personal projects, social media, or professional work. While it may seem complex at first, breaking the process into manageable steps makes it much more approachable. Starting with beginner-friendly software and focusing on essential techniques—such as trimming, transitions, and audio adjustments—lays a strong foundation for future growth.
As you gain confidence, you can explore advanced editing techniques like color grading, motion graphics, and special effects, enhancing the visual appeal of your videos. Remember, video editing is a continuous learning journey, and the more you practice, experiment, and seek inspiration from professionals, the more skilled and creative you’ll become. Stay patient, stay curious, and enjoy the process of bringing your visual stories to life!