

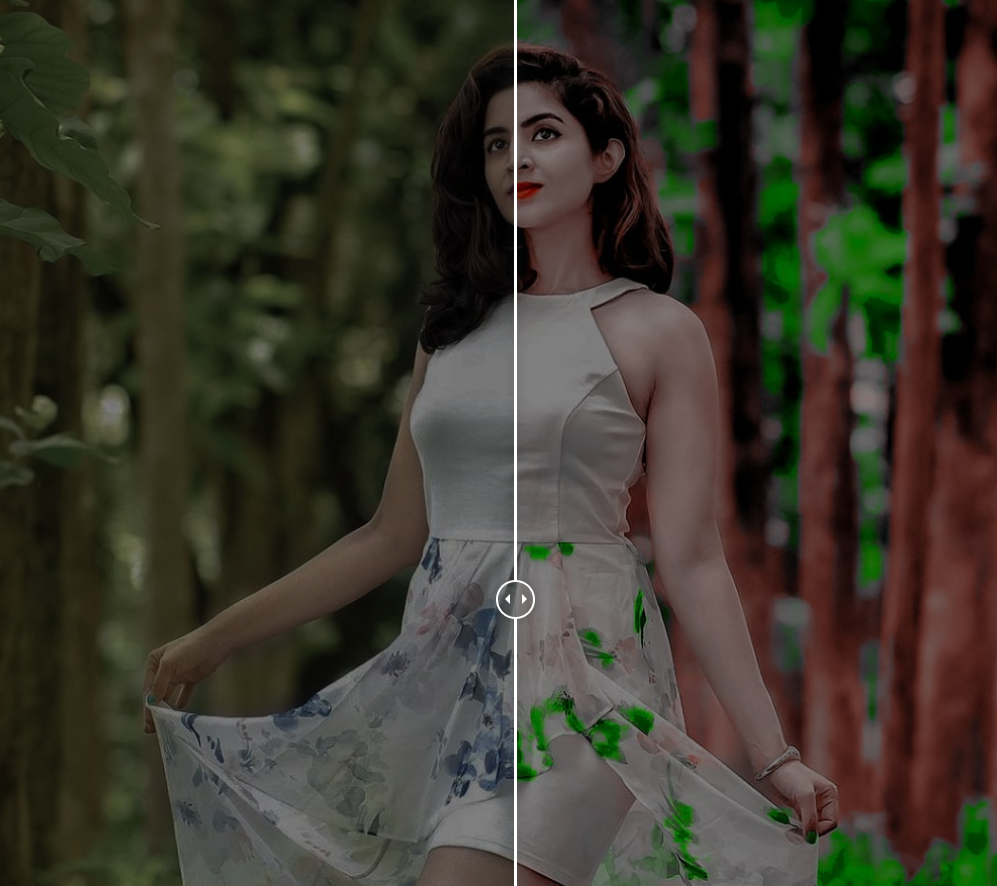
Hello, everyone! I hope you’re doing great. In today’s article, we’re thrilled to introduce the Lightroom Green and Orange Preset, a powerful tool designed to elevate your photos with just a single click. Whether you’re looking to enhance the vibrancy of your greens or add a rich, warm orange tone, this preset delivers a stunning color balance that makes your images stand out.
This free Lightroom preset is perfect for photographers, content creators, and editing enthusiasts who want to achieve a unique and professional-grade color effect effortlessly. With its carefully crafted adjustments, it enhances the natural elements of your images, making them look both dynamic and aesthetically appealing.
Best of all, downloading the Lightroom Green and Orange Preset is absolutely free. In this guide, we’ll provide step-by-step instructions on how to download and apply this preset seamlessly, ensuring that you can achieve breathtaking results in no time.
Stay with us as we walk you through the entire process, so you can transform your photos instantly with this incredible preset!
About Lightroom App
Adobe Lightroom is a powerful and versatile photo editing application that has redefined the way photographers and content creators enhance their images. Developed by Adobe, this professional-grade editing tool offers an intuitive interface and advanced features, making it a go-to choice for both beginners and experts.
One of Lightroom’s standout features is its preset functionality, allowing users to apply high-quality, pre-configured edits with just one click. Unlike many other photo editing apps, Lightroom ensures that adjustments are applied seamlessly while maintaining the original resolution and image quality. This makes it an essential tool for professional photographers, social media influencers, and creative enthusiasts who require precision, flexibility, and high-end results.
What truly sets Lightroom apart is its non-destructive editing capability, meaning your original image remains intact while you refine details such as exposure, color grading, sharpness, and lighting. Whether you’re looking for a quick enhancement or a detailed edit, Lightroom provides exceptional control over every aspect of your photo editing workflow.
Lightroom App All Tools
The Adobe Lightroom app is packed with powerful editing tools that allow users to achieve professional-quality photo enhancements with ease. Whether you’re a beginner or an expert, these tools provide precision, control, and flexibility to bring your creative vision to life. Below are some of the most essential tools that make Lightroom a top choice for photographers and content creators.
Auto Tool
The Auto tool is a quick and efficient way to enhance your images instantly. With just one click, it automatically adjusts exposure, contrast, and lighting, making it an excellent starting point before diving into manual edits. It analyzes the image and applies intelligent corrections to ensure a balanced and visually appealing result.
Light Tool
The Light tool allows for precise adjustments to your photo’s brightness and exposure. Whether your image is overexposed or underexposed, this tool lets you manually fine-tune:
✔ Exposure – Adjust the overall brightness of your image.
✔ Contrast – Enhance the difference between light and dark areas.
✔ Highlights & Shadows – Control the details in bright and dark areas.
✔ Whites & Blacks – Adjust the purest white and black levels for deeper contrast.
Color Tool
One of Lightroom’s most powerful features, the Color tool gives users full control over the color grading process. It allows you to:
✔ Modify individual color tones to achieve the perfect mood.
✔ Adjust saturation and vibrancy for richer colors.
✔ Fine-tune temperature and tint to match your creative vision.
Whether you want a warm, cinematic look or a cool, moody tone, the Color tool helps you create stunning effects with ease.
Effect Tools
The Effect tools let you add textures, depth, and unique adjustments to your photos. These include:
✔ Clarity – Enhances mid-tone contrast for a sharp, crisp look.
✔ Texture – Adds fine details to make objects stand out.
✔ Dehaze – Reduces fog or enhances haze for dramatic effects.
✔ Vignette – Darkens or lightens the edges to create a focus effect.
Additional Advanced Tools
In addition to these essential tools, Lightroom offers several advanced editing features to refine your photos further:
✔ Detail Tool – Sharpens images and reduces noise for high-quality results.
✔ Optics – Fixes lens distortions and chromatic aberrations for cleaner visuals.
✔ Geometry – Corrects perspective and alignment issues, perfect for architecture photography.
✔ Healing – Removes unwanted objects or blemishes seamlessly.
✔ Crop – Adjusts the composition and aspect ratio to fit your desired framing.
✔ Masking – Applies targeted edits to specific areas of your image for precise adjustments.
With this comprehensive set of tools, Lightroom empowers you to create professional-level edits effortlessly, ensuring every photo looks its absolute best.
How Do You Use Presets in the Lightroom Mobile App?
Using Lightroom presets is one of the easiest ways to achieve stunning photo edits with just a single tap. These presets contain predefined adjustments for elements like exposure, contrast, saturation, and color grading, allowing you to create a consistent and professional look without the need for complex manual editing. Below is a detailed step-by-step guide on how to download, install, and use presets in the Lightroom mobile app.
1. Download and Install the Lightroom Mobile App
Before using presets, make sure you have Adobe Lightroom Mobile installed on your iOS or Android device. You can download it for free from the App Store (iPhone/iPad) or Google Play Store (Android).
2. Open Lightroom and Import Your Photo
Once installed, open the Lightroom app and follow these steps to import the photo you want to edit:
✔ Tap the “+” icon or the “Add Photos” button.
✔ Choose the image from your device’s gallery or camera roll.
✔ Tap “Import” to load the photo into Lightroom.
3. Access the Presets Panel
With your photo selected, tap on the Edit button (represented by the slider icon) at the bottom of the screen. Scroll through the editing tools until you find the Presets panel—this is where you can apply different preset styles to your image.
4. Apply a Preset
✔ Tap the Presets option to access the available preset collections.
✔ Choose from built-in Lightroom presets or any custom presets you have installed.
✔ Browse through the different styles and tap on a preset to apply it instantly to your photo.
Once applied, the preset will automatically adjust your image using its predefined settings, giving you a professional and polished look in seconds.
5. Fine-Tune the Edit (Optional)
While presets provide a quick and effective enhancement, you may want to fine-tune the edit to better match your image’s lighting and composition. Lightroom allows you to manually adjust:
✔ Exposure – Brighten or darken the image.
✔ Contrast – Enhance the difference between highlights and shadows.
✔ Saturation & Vibrance – Control the intensity of colors.
✔ White Balance – Adjust temperature and tint for a natural look.
By tweaking these settings, you can personalize the preset to perfectly fit your photo.
6. Save or Export Your Edited Photo
Once you’re happy with the final edit, save or export your photo by:
✔ Tapping the checkmark in the top-right corner to confirm the edits.
✔ Clicking the Share icon (box with an arrow).
✔ Choosing to save the image to your device or share it on social media platforms.
7. Installing Custom Presets (Optional)
If you’ve downloaded third-party Lightroom presets, you’ll need to import them manually:
✔ Open the Presets panel in Lightroom.
✔ Tap the three-dot menu in the upper-right corner.
✔ Select Import Presets and locate the preset file (DNG, XMP, or ZIP format) on your device.
✔ Once imported, the preset will be saved and ready for use.
Why Use Presets in Lightroom Mobile?
✔ Fast & Easy Editing – Apply professional-quality edits in seconds.
✔ Consistent Style – Maintain a cohesive look across all your photos.
✔ Customizable Adjustments – Fine-tune any preset to match your unique aesthetic.
✔ Perfect for Beginners & Experts – No need for advanced editing skills—just tap and apply.
By following these steps, you can unlock the full potential of Lightroom presets, transforming your photos with minimal effort while maintaining a high-quality and polished finish.
Lightroom Preset Features
Lightroom presets provide an effortless way to enhance your photos with professional-grade edits. Here are the key features of the Lightroom preset you’re about to download:
✔ Premium Color Tones – Achieve stunning and vibrant color effects with a single click. The preset is designed to enhance your images with rich, well-balanced hues that make your photos stand out.
✔ Completely Free to Download – No hidden costs! You can download and use this preset absolutely free without any restrictions.
✔ Compatible with Lightroom Mobile App – The preset works seamlessly on the Lightroom mobile app, allowing you to edit your photos anytime, anywhere.
✔ No Bugs or Issues – This preset is tested and optimized for a smooth editing experience, ensuring no crashes, lags, or errors while applying it to your images.
System Requirements
Before downloading and using this Lightroom preset, ensure that your device meets the following requirements for optimal performance:
✔ Operating System – Android KitKat 4.0 or above.
✔ RAM – Minimum 1 GB RAM required for smooth functioning.
✔ Storage Space – At least 4 GB of free storage on your device to save and process high-quality images.
✔ Latest Lightroom Version Installed – Ensure you have the most recent version of Adobe Lightroom Mobile for full compatibility and access to all editing tools.
By meeting these system requirements, you’ll be able to seamlessly install and apply the preset without any issues, unlocking a powerful and efficient photo editing experience!
How to Download Lightroom Green and Orange Preset?
Downloading the Lightroom Green and Orange preset is quick and simple. Follow the steps below to get started:
✔ Step 1: Scroll down to locate the download button.
✔ Step 2: Click on the button, and you’ll be redirected to the preset download page.
✔ Step 3: Tap the download button above to start downloading the preset file to your device.
Once the download is complete, you can import the preset into Lightroom Mobile and start applying the vibrant green and orange color effect to your photos instantly!
How to Use Lightroom Green and Orange Preset?
Applying the Lightroom Green and Orange preset is a simple and effective way to enhance your photos with a vibrant, cinematic touch. Follow these easy steps to use the preset in the Lightroom mobile app:
✔ Step 1: Download and Install Lightroom Mobile
If you haven’t already, install the Adobe Lightroom app from the Google Play Store (Android) or App Store (iOS). Ensure the app is updated to the latest version for the best experience.
✔ Step 2: Import Your Photo
Open the Lightroom app and tap the “+” icon to add a new photo. Select the image you want to edit from your gallery and open it in the Lightroom workspace.
✔ Step 3: Access the Presets
Once your photo is loaded, tap the “Edit” icon (slider symbol) at the bottom of the screen. Scroll through the editing tools and find the “Presets” option.
✔ Step 4: Apply the Green and Orange Preset
Inside the Presets panel, locate the Green and Orange preset that you previously downloaded. Simply tap on it, and Lightroom will automatically adjust your photo’s tones to achieve the bold green and orange effect.
✔ Step 5: Fine-Tune the Edits (Optional)
If necessary, you can manually adjust the exposure, contrast, saturation, or other settings to customize the look according to your preference.
✔ Step 6: Save and Export Your Edited Photo
Once you’re satisfied with the result, tap the checkmark to apply the edits. To save or share your enhanced photo, tap the Share icon and choose your preferred export option, whether saving it to your device or sharing it on social media.
By following these steps, you can effortlessly apply the Green and Orange preset to create stunning, professional-quality photos with minimal effort.
Frequently Asked Questions
✔ What are Green and Orange Presets in Lightroom?
Green and orange presets are specialized photo filters or editing presets designed to enhance or shift color tones in an image, emphasizing rich green and warm orange hues. These presets are widely used in nature, outdoor, and cinematic photography to create vibrant, earthy, and aesthetically pleasing effects.
✔ Where Can I Download Green and Orange Presets for Lightroom?
Green and orange presets can be found on Lightroom preset websites, photography blogs, and digital marketplaces like Etsy, Creative Market, and Adobe Exchange. Many professional photographers and content creators offer both free and premium presets for download.
✔ Are Green and Orange Presets Compatible with All Lightroom Versions?
Most green and orange presets are compatible with Lightroom Mobile and Lightroom Desktop (Windows/Mac). However, it’s important to check the preset format (XMP, DNG, or LRTEMPLATE) and ensure that your Lightroom version supports the preset you are downloading.
✔ Do Green and Orange Presets Work Well with All Types of Photos?
These presets generally work best with outdoor photography, travel shots, portraits, and lifestyle images, where natural green and orange tones are already present. However, the final result depends on lighting conditions, image quality, and original color balance—so some manual adjustments may be needed for the perfect look.
✔ Can I Edit the Green and Orange Presets After Applying Them?
Yes! Lightroom presets act as a base edit, meaning you can fine-tune settings like exposure, contrast, saturation, highlights, and shadows to match your personal style or the specific needs of an image.
✔ Are There Free Green and Orange Presets Available?
Yes, many websites offer free green and orange presets that you can download and use immediately. While premium presets may provide more refined or unique effects, free presets can still produce professional-quality edits.
Conclusion
Lightroom Green and Orange presets are an excellent way to enhance your photos effortlessly, creating a cohesive, warm, and vibrant aesthetic. Whether you’re working with landscapes, portraits, or lifestyle photography, these presets can help you achieve professional-grade results with minimal effort.
With options available for Lightroom Mobile and Desktop, you can find both free and premium presets to suit your needs. Regardless of which preset you choose, you can always customize the edits to match your creative vision, making these presets a valuable tool for photographers and content creators alike.