

Hello, everyone! I hope you’re all doing great. Today, I’m thrilled to introduce you to an incredible Lightroom Green Preset that will completely transform your images with just a single click. If you’ve been looking for a quick and effective way to enhance your photos with rich, natural green tones, this preset is exactly what you need. The best part? It’s absolutely free to download and use!
Photo editing can often feel overwhelming, especially for beginners, but this preset is designed to make the process effortless and efficient. Whether you’re an amateur photographer, a social media enthusiast, or a professional looking to save time while achieving high-quality edits, this preset simplifies everything. Instead of spending hours adjusting settings like saturation, contrast, and color balance, you can instantly apply a beautifully enhanced green tone that elevates your image with just one tap.
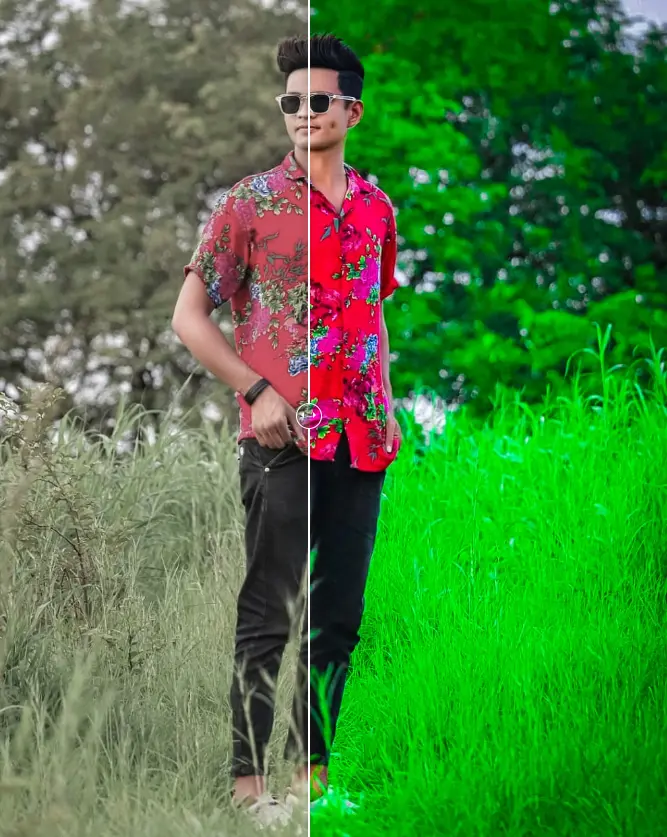
Using the Lightroom Green Preset allows you to create a consistent aesthetic for your photos, making it perfect for landscapes, outdoor portraits, travel shots, and nature photography. It enhances the vibrancy of green shades without oversaturating the image, maintaining a natural yet eye-catching look. Whether you’re editing for personal use, Instagram, or a professional portfolio, this preset ensures that your images stand out with a fresh, dynamic appearance.
To help you make the most of this free Lightroom Green Preset, I’ve provided a step-by-step guide on how to download and apply it to your images. Just follow the simple instructions below, and within minutes, you’ll have beautifully enhanced photos ready to share.
Let’s dive in and take your photo editing skills to the next level with this powerful Lightroom Green Preset!
About the Lightroom App
Adobe Lightroom is a game-changing photo editing application that has transformed the way photographers—both beginners and professionals—enhance their images. This powerful app offers a seamless and intuitive editing experience, making it one of the most preferred tools in the photography world. Whether you’re looking to fine-tune exposure, correct colors, or apply artistic effects, Lightroom provides a feature-rich platform designed to help you achieve stunning results.
One of the standout aspects of Lightroom is its ability to deliver professional-quality edits directly from a mobile device. Unlike traditional editing software that requires a desktop setup, Lightroom allows users to edit on the go, making it a convenient choice for photographers and social media content creators. The app’s easy-to-use interface ensures that both beginners and advanced users can enhance their images with precision and efficiency.
A key feature that sets Lightroom apart from other photo editing apps is its preset functionality. With just a single click, users can apply a variety of pre-configured edits, streamlining the editing process while maintaining a consistent aesthetic. This feature saves time while ensuring high-quality results, making it especially useful for content creators, influencers, and photographers who need quick yet professional edits.
What truly makes Lightroom a standout choice is its commitment to preserving image quality. Unlike many other editing apps that may reduce resolution or introduce distortion, Lightroom ensures that your photos retain their sharpness, clarity, and original detail, even after extensive editing. Whether you’re adjusting lighting, enhancing a landscape, or adding creative effects, Lightroom maintains the integrity of your images, allowing you to produce visually stunning and high-resolution photos every time.
Lightroom App – All Tools & Features Explained
Lightroom is packed with powerful tools designed to help photographers and content creators achieve professional-quality edits with ease. Whether you’re a beginner looking to enhance your photos quickly or an experienced editor aiming for precision, Lightroom offers a comprehensive set of features to refine every detail of your images. Below is a detailed breakdown of the most essential tools within the Lightroom app.
Auto Tool
The Auto tool is a quick and efficient way to improve your images instantly. With a single tap, Lightroom analyzes your photo and makes automatic adjustments to exposure, contrast, highlights, and shadows, enhancing the overall look. This feature serves as an excellent starting point before making manual refinements.
Light Tool
For precise control over brightness and contrast, the Light tool allows you to manually adjust exposure, highlights, shadows, whites, and blacks. If your image is too dark or overly bright, this tool lets you fine-tune the lighting to achieve a well-balanced composition. This feature is crucial for enhancing natural lighting effects and creating dramatic, eye-catching images.
Color Tool
One of Lightroom’s standout features, the Color tool provides complete control over the hues and tones in your image. You can adjust temperature, tint, vibrance, and saturation to either enhance natural colors or create a customized color grading effect. Whether you want warm, golden hues for a sunset or cool, moody tones for an urban scene, this tool gives you the flexibility to create stunning color palettes.
Effect Tools
The Effect tools section offers a variety of enhancements that add depth and texture to your images. Some key effects include:
- Clarity – Enhances mid-tone contrast for a crisp, defined look.
- Dehaze – Reduces atmospheric haze, bringing out details in foggy or low-contrast images.
- Grain – Adds a film-like texture for a vintage or cinematic effect.
Advanced Editing Tools in Lightroom
Detail Tool
The Detail tool helps refine image sharpness while minimizing noise. This feature is essential for bringing out textures in landscapes, portraits, or macro photography while ensuring the image remains natural-looking.
Optics Tool
For lens correction, the Optics tool is indispensable. It automatically detects and corrects lens distortion, chromatic aberration, and unwanted vignetting, ensuring that your images are optically accurate and distortion-free.
Geometry Tool
If you need to fix skewed perspectives, the Geometry tool is perfect for adjusting lines and structures within your image. This tool is particularly useful for architecture and real estate photography, allowing you to straighten tilted buildings and correct wide-angle distortions.
Healing Tool
The Healing tool is a must-have for retouching. It allows you to remove unwanted objects, blemishes, dust spots, or distractions from your image. With seamless blending, this tool ensures a clean and professional finish without affecting the overall composition.
Crop Tool
With the Crop tool, you can adjust framing, straighten horizons, and refine the composition of your image. It offers multiple aspect ratios for social media, prints, and other formats, making it easy to create perfectly balanced visuals.
Masking Tool
One of the most powerful features in Lightroom, the Masking tool lets you apply targeted adjustments to specific areas of your image. Whether you need to brighten a subject, darken the background, or enhance selective details, this feature provides complete control over local adjustments.
Final Thoughts
With its extensive range of tools, Lightroom provides photographers with unmatched flexibility and creative control over their images. Whether you’re making simple brightness corrections or engaging in complex photo retouching, Lightroom ensures high-quality, professional edits every time. Mastering these tools will allow you to refine your workflow and produce visually stunning results with ease.
How to Use Presets in the Lightroom Mobile App
Using presets in Lightroom Mobile is a quick and effective way to enhance your photos with professional-quality edits in just a few taps. Whether you’re a beginner or an experienced photographer, presets help maintain a consistent aesthetic across your images while saving time on manual adjustments.
Here’s a step-by-step guide to using presets in Lightroom Mobile:
1. Download and Import the Preset
To start using a preset, you’ll need to import it into Lightroom. Follow these steps:
- Download the preset: If you’ve obtained a preset from an external source (such as a website, blog, or from a fellow photographer), ensure it’s in a DNG format or any other Lightroom-compatible format.
- Import the preset:
- Open the Lightroom Mobile app.
- Navigate to the Library tab.
- Tap the Add Photos button (+ icon).
- Select the DNG file containing the preset from your phone’s storage.
- Once imported, the DNG file will appear in your Lightroom library as an image with the preset applied.
2. Apply the Preset to Your Photo
Now that the preset is imported, you can save and apply it to other images:
- Open the imported DNG file in Lightroom.
- Tap the three-dot menu (located in the upper-right corner).
- Select Create Preset.
- Name the preset and choose the settings you want to save (select all or specific adjustments).
- Tap Save to store the preset in your collection.
3. Use the Preset on Other Photos
After saving your preset, you can quickly apply it to other images:
- Open the photo you want to edit.
- Tap the Presets button (located at the bottom of the editing tools).
- Navigate to the User Presets section, where your newly saved preset will be available.
- Tap the preset to instantly apply the saved settings to your photo.
4. Fine-Tune the Preset (Optional)
Every photo is different, so sometimes minor adjustments may be needed:
- After applying the preset, use Lightroom’s editing tools (such as exposure, contrast, temperature, or color adjustments) to refine the look.
- If you create a modified version of the preset that you prefer, save it as a new preset by repeating Step 2.
5. Sync Presets Across Devices (Optional)
If you have an Adobe Creative Cloud subscription, your presets will automatically sync across all devices where you’re logged into your Adobe account. This allows you to use your presets seamlessly on your mobile, tablet, and desktop versions of Lightroom.
6. Explore and Download More Presets
Lightroom Mobile also offers built-in presets under the Discover tab. Additionally, you can find free and premium presets from various online sources and repeat the import process to expand your collection.
Lightroom Preset Features & System Requirements
Lightroom presets provide a seamless way to enhance your photos with professional-grade color tones and effects. Whether you’re a beginner or an experienced photographer, these presets offer a quick and efficient way to achieve a consistent and visually stunning aesthetic.
Lightroom Preset Features
✅ Free to Download – Enjoy high-quality presets without any cost.
✅ Premium Color Tones – Get access to advanced color grading effects for cinematic, vintage, pastel, and vibrant edits.
✅ Compatible with Lightroom Mobile App – Use these presets effortlessly on the Lightroom Mobile app for editing on the go.
✅ No Bugs – Optimized for smooth performance without any glitches or crashes.
System Requirements for Using Lightroom Presets
To ensure smooth performance, make sure your device meets the following minimum requirements:
📱 Operating System: Android KitKat 4.0 or higher.
💾 RAM: At least 1 GB for lag-free performance.
📂 Storage Space: Minimum 4 GB of free space to store and apply presets efficiently.
🔄 Lightroom Version: Ensure that you have the latest version of Adobe Lightroom installed for compatibility and access to the newest features.
By meeting these system requirements, you can maximize your photo editing experience and take full advantage of Lightroom’s powerful presets for stunning results. 🚀
How to Download Lightroom Presets for Free?
Downloading Lightroom presets for free is a simple process. Follow these steps to get your presets and start enhancing your photos effortlessly:
1️⃣ Scroll Down – Navigate to the download section of the webpage.
2️⃣ Find the Download Option – Look for the Lightroom preset download button.
3️⃣ Click to Access – Tap on the download button to initiate the process.
4️⃣ Save the Preset – Once the file is ready, it will be saved to your device storage.
After downloading, you can import the preset into Lightroom Mobile or Desktop to apply professional-grade effects to your images instantly! 🚀
How to Use the Green Preset in Lightroom?
Transform your photos with the Lightroom Moody Green Preset in just a few easy steps! Follow this guide to apply the preset and achieve stunning green tones effortlessly.
1️⃣ Download the Preset
➡️ Click the download option below and save the preset file to your device storage.
2️⃣ Open Lightroom
➡️ Launch the Lightroom Mobile App and tap Add Photo to import the preset.
3️⃣ Access the Preset
➡️ Open the imported preset, tap the three-dot menu (top-right corner), and select Copy Settings.
4️⃣ Apply the Preset
➡️ Tap the checkmark to confirm the copied settings. Then, go back and select the photo you want to edit.
5️⃣ Paste the Preset Settings
➡️ Tap the three-dot menu again and select Paste Settings.
✨ That’s it! Your image will now have a stunning moody green effect, instantly transforming the overall look with a single tap! 🚀
Frequently Asked Questions
1️⃣ How do I install the Lightroom Green Preset on my phone?
To install the preset, download the DNG file, open Lightroom Mobile, and import it as a new photo. Once imported, tap the three-dot menu, select Copy Settings, and paste them onto any image to instantly apply the preset.
2️⃣ Can I adjust the preset after applying it?
Yes! While the preset provides a beautiful green tone, you can fine-tune settings like exposure, contrast, shadows, and highlights to better suit your photo. Lightroom allows for full customization, so you can achieve a look that matches your personal style.
3️⃣ Will this preset work on all types of photos?
The Lightroom Green Preset works best on images featuring natural elements like trees, plants, or landscapes. While it can be applied to any image, results may vary depending on lighting conditions and original colors. Minor adjustments may be needed for optimal results.
4️⃣ Is the preset compatible with desktop versions of Lightroom?
Although this preset is primarily designed for Lightroom Mobile, it can also be used in Lightroom Classic or Lightroom CC by converting the DNG file into an XMP preset. This allows you to apply the same green-toned effect across both mobile and desktop editing workflows.
5️⃣ What should I do if the preset doesn’t work properly?
If the preset isn’t applying correctly, ensure that:
✔️ You have the latest version of Lightroom installed.
✔️ Your device meets the minimum system requirements.
✔️ You are copying and pasting settings properly from the DNG file.
If issues persist, try restarting the app or reinstalling Lightroom.
Conclusion
The Lightroom Green Preset is a fantastic way to bring out natural beauty in your photos with minimal effort. Whether you’re an amateur or a professional photographer, this preset provides quick, professional-grade color enhancements that instantly elevate your images.
With free access, mobile compatibility, and full customization options, this preset is an essential tool for achieving stunning, high-quality edits. Download it today and start transforming your photos with just a single tap!