

Hello, everyone! I hope you’re all doing well. In today’s article, we are thrilled to introduce the Lightroom Green and Orange Preset, a powerful tool that instantly enhances your photos with a dynamic and eye-catching color effect. Whether you’re an aspiring photographer, a content creator, or someone who loves experimenting with photo editing, this preset is designed to help you achieve professional-quality results with minimal effort.
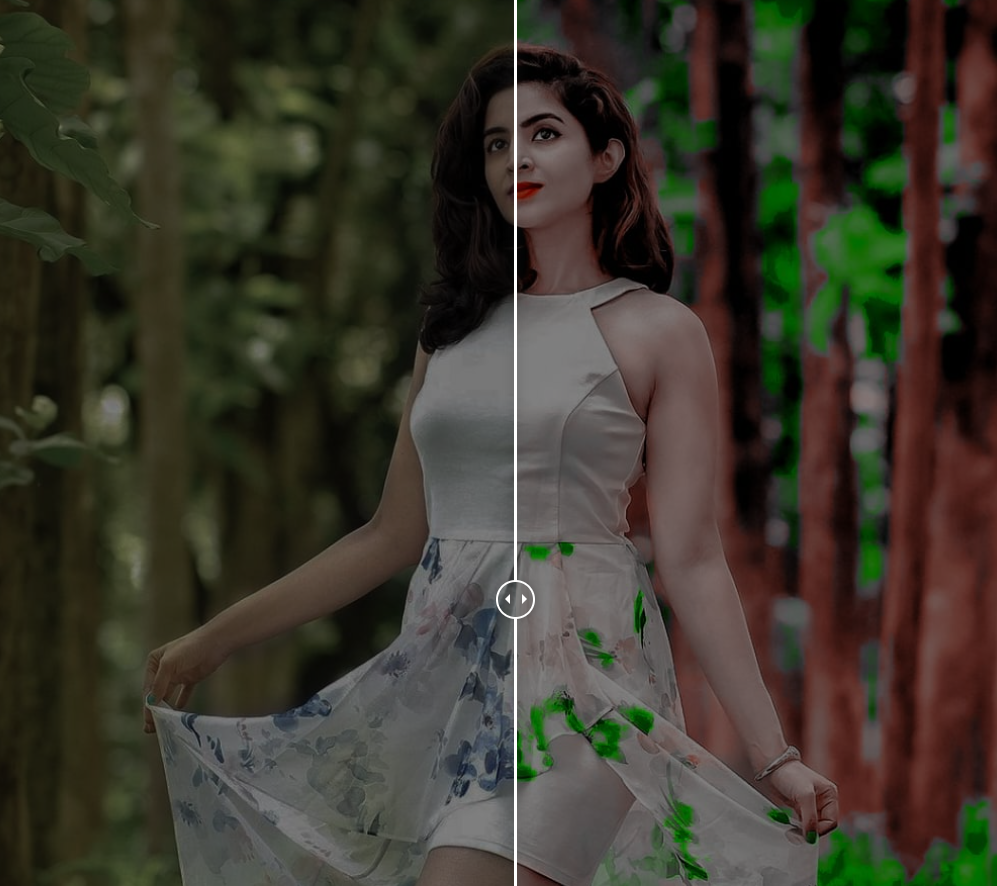
With just a single click, the Lightroom Green and Orange Preset will transform your images by amplifying lush green tones and warm orange highlights, creating a balanced yet striking color composition. This preset is perfect for outdoor photography, travel shots, nature scenes, and creative portrait edits, giving your images a fresh and vibrant aesthetic.
The best part? You can download the Lightroom Green and Orange Preset for free and start using it right away! Whether you’re new to Lightroom or an experienced editor, this preset simplifies the editing process, allowing you to enhance your photos effortlessly. Instead of spending hours fine-tuning color settings manually, you can achieve a polished, high-quality look with just a few taps.
In this guide, we will provide you with a step-by-step tutorial on how to download, install, and apply this amazing preset in the Lightroom Mobile App. We will walk you through the entire process, ensuring that you can take full advantage of this preset’s capabilities to make your photos stand out.
So, if you’re looking to add a unique, professionally edited feel to your images while maintaining a natural and artistic touch, this preset is a must-have. Stay tuned as we delve into the details, and get ready to elevate your photo editing game with the Lightroom Green and Orange Preset!
About Lightroom App?
Lightroom is a highly advanced and versatile photo editing application developed by Adobe, known for its precision and user-friendly interface. It has revolutionized the way photographers and content creators edit their images, offering a seamless experience whether you are working on a mobile device or desktop. One of Lightroom’s most powerful features is the use of presets, which allow users to apply complex edits instantly with a single click. This functionality saves time and ensures a consistent aesthetic across multiple images—something many other editing apps lack.
What makes Lightroom stand out is its ability to enhance photos without compromising quality. Unlike some other editing tools that compress images or reduce resolution, Lightroom ensures that your edits retain the original sharpness and clarity. Whether you’re making subtle refinements or bold adjustments, your images will maintain their professional-grade quality.
Lightroom App All Tools:
Lightroom provides an extensive suite of editing tools that cater to beginners and professionals alike. Below are some of the most essential features that make it an industry-leading editing app:
Auto Tool
The Auto tool is a quick way to enhance your image with just one tap. It analyzes your photo and automatically adjusts brightness, contrast, and exposure for an improved look. This feature is especially useful when you need fast, effective edits before refining your image manually.
Light Tool
The Light tool allows for precise control over brightness, exposure, contrast, highlights, and shadows. If your photo is underexposed or too bright, this tool helps you correct it effortlessly, ensuring a balanced and natural-looking result.
Color Tool
One of Lightroom’s most powerful and popular features, the Color tool enables you to fine-tune the hues, saturation, and luminance of each individual color in your photo. Whether you want to enhance natural tones or create a stylized look, this tool provides complete control over color grading.
Effect Tools
The Effects tools allow you to add textures, adjust clarity, and apply creative effects to give your photos a unique touch. You can use features like Dehaze to remove fog and improve sharpness or apply Vignette to add artistic depth.
Additional Advanced Tools in Lightroom:
Beyond the core tools, Lightroom offers several advanced features that help take your editing to the next level:
- Detail Tool – Enhance sharpness and reduce noise for crystal-clear images.
- Optics – Correct lens distortions and chromatic aberrations.
- Geometry – Adjust perspective and straighten lines for professional composition.
- Healing – Remove unwanted objects or blemishes with precision.
- Crop – Resize and frame your images perfectly.
- Masking – Apply selective edits to specific areas of your photo for more control.
With this powerful toolkit, Lightroom empowers users to create stunning, professional-quality edits with ease. Whether you’re a beginner exploring photography or a seasoned editor looking for precise control, Lightroom is the ultimate solution for all your photo editing needs.
How do you use presets in the Lightroom mobile app?
Using presets in the Lightroom mobile app is an efficient and convenient way to enhance your photos with a professional touch. With just one tap, presets apply a predefined set of adjustments such as exposure, contrast, color balance, and tone grading, helping you achieve a consistent aesthetic across multiple images. Whether you’re a beginner or an experienced photographer, using Lightroom presets can significantly speed up your editing process. Below is a step-by-step guide on how to apply and install presets in Lightroom Mobile.
1. Download and Install the Lightroom Mobile App
To get started, ensure that you have the Adobe Lightroom Mobile app installed on your smartphone or tablet. It is available for both iOS and Android and can be downloaded from the App Store or Google Play Store.
2. Open Lightroom and Import Your Photo
Once installed, launch the Lightroom app and import the photo you want to edit:
- Tap the “+” icon or select “Add Photos.”
- Choose an image from your gallery, camera roll, or cloud storage.
3. Access the Presets Panel
- After importing the image, tap on the “Edit” button (represented by the slider icon at the bottom of the screen).
- Scroll through the editing options and look for the “Presets” panel.
- This section contains default Lightroom presets as well as any custom presets you’ve downloaded or created.
4. Apply a Preset
- Tap on the Presets tab, and a list of available presets will appear.
- Scroll through the presets and select one that best suits your photo.
- Once selected, the preset’s adjustments (such as brightness, contrast, saturation, and colors) will be automatically applied to your image.
5. Fine-Tune the Edit (Optional)
While presets provide a great starting point, you might want to make minor adjustments for a more personalized look:
- Use the Light, Color, and Effects tools to tweak exposure, contrast, highlights, shadows, saturation, and more.
- Adjust individual color tones for a more refined and customized style.
6. Save or Export Your Edited Photo
Once you’re satisfied with your edits:
- Tap the checkmark at the top right to save changes.
- To export your photo, tap the Share icon, then select your preferred format and destination (Gallery, Social Media, Cloud Storage, etc.).
7. Installing Custom Presets (Optional)
If you’ve downloaded custom presets in .dng or .xmp format, follow these steps to import them into Lightroom:
- Navigate to the Presets panel and tap the three-dot menu in the top-right corner.
- Choose “Import Presets” and select the preset files from your device storage.
- Once imported, they will be saved in your User Presets collection for easy access.
Lightroom Preset Features:
✅ Premium Color Tones for professional-quality edits.
✅ Completely Free to Download for easy access.
✅ Compatible with the Lightroom Mobile App on both iOS & Android.
✅ No Bugs or Issues, ensuring a seamless editing experience.
System Requirements:
✔ Android Version: KitKat 4.0 or later.
✔ RAM: Minimum 1GB RAM for smooth performance.
✔ Storage: At least 4GB free space on your device.
✔ App Version: Ensure you have the latest version of Lightroom installed.
By following these simple steps, you can effortlessly edit and enhance your photos using Lightroom presets. Whether you’re working on landscapes, portraits, or creative photography, presets can help you achieve professional-looking results in just a few taps. Enjoy creating stunning images with Lightroom!
How to Download Lightroom Green and Orange Preset
Downloading the Lightroom Green and Orange Preset is simple and quick. Follow these steps to get started:
- Scroll down to locate the download button provided in this guide.
- Click on the download option, and you will be redirected to the preset file.
- Tap the download button to start downloading the preset to your device.
Once the preset file is downloaded, you’re ready to import and apply it in Lightroom Mobile for stunning edits.
How to Use Lightroom Green and Orange Preset
The Lightroom Green and Orange Preset is designed to enhance your photos with a cinematic, vibrant look, making them visually appealing with a balanced contrast between green and orange tones. Here’s a step-by-step guide on how to use it in the Lightroom Mobile app:
1. Download and Install Lightroom Mobile App
If you haven’t already, download the Adobe Lightroom Mobile App from the Google Play Store (Android) or App Store (iOS). Ensure that your app is updated to the latest version for optimal performance.
2. Import Your Photo into Lightroom
- Open the Lightroom app on your mobile device.
- Tap the “+” icon and choose “Add Photos.”
- Select the image you want to edit from your gallery or camera roll.
- Open the imported photo in the Lightroom editing workspace.
3. Access the Presets Panel
- After opening your photo, tap the Edit button (represented by a slider icon at the bottom of the screen).
- Scroll through the editing options and find “Presets.”
- This section contains both Lightroom default presets and any custom presets you have installed.
4. Apply the Green and Orange Preset
- Tap on Presets, and you will see a list of available options.
- Locate the Green and Orange Preset that you downloaded.
- Tap on it, and Lightroom will automatically apply the preset adjustments to your photo.
5. Adjust the Settings (Optional)
While the preset applies a great color balance, you may want to make minor adjustments for a customized look:
- Adjust the exposure to brighten or darken the image.
- Modify the contrast, highlights, and shadows for better depth.
- Fine-tune the saturation and vibrance to enhance the color intensity.
6. Save and Export Your Edited Photo
Once you’re happy with the final edit:
- Tap the checkmark (✔) to save the changes.
- Tap the Share icon (usually found in the top-right corner).
- Choose your preferred export settings:
- Save to device gallery
- Share on social media platforms
- Send via email or messaging apps
By following these steps, you can quickly achieve a stunning Green and Orange color effect that adds vibrancy and depth to your images, all with minimal effort using Lightroom Mobile.
Frequently Asked Questions
What are Green and Orange Presets in Lightroom?
Green and orange presets are photo filters designed to adjust the color tones of your images, enhancing them with vibrant green and orange hues. These presets create warm, nature-inspired, or cinematic looks, making them ideal for adding a unique touch to outdoor, portrait, or lifestyle photography. They are perfect for creating an aesthetically pleasing vibe with minimal effort.
Where Can I Download Green and Orange Presets for Lightroom?
You can find Green and Orange presets for Lightroom from various sources, including:
- Photography blogs and preset websites
- Online marketplaces like Etsy and Creative Market
- Professional photographers who share their custom presets for free or for purchase
Make sure to download presets from trusted sources to ensure compatibility and quality.
Are Green and Orange Presets Compatible with All Lightroom Versions?
Yes, most Green and Orange presets work with both Lightroom Desktop (Windows/Mac) and Lightroom Mobile. However, some older versions of Lightroom may not support certain features of newer presets. Always check the compatibility details before downloading to avoid any issues.
Do Green and Orange Presets Work Well with All Types of Photos?
These presets typically work best with:
- Outdoor photography (landscapes, nature)
- Portraits
- Lifestyle shots
While the green and orange tones are versatile, the effectiveness can depend on the original image’s lighting, composition, and colors. For the best results, some minor tweaks may be necessary after applying the preset.
Can I Edit the Green and Orange Presets After Applying Them?
Yes, Lightroom presets are fully adjustable. After applying the Green and Orange preset, you can fine-tune various settings such as:
- Exposure
- Contrast
- Saturation
- Shadows/Highlights
These adjustments allow you to tailor the preset to your personal style and to match the unique characteristics of each photo.
Are There Free Green and Orange Presets Available?
Yes, there are several free Green and Orange presets available on websites and platforms. While premium presets may offer more unique looks or advanced features, free presets can still provide excellent results for your editing needs.
Conclusion
Green and Orange Lightroom presets are an easy and effective way to enhance your images with vibrant tones, creating beautiful, cohesive looks for a variety of photo types, including landscapes, portraits, and lifestyle shots. Whether you use free or premium presets, the ability to adjust settings gives you full creative control.