

Hello, everyone! I hope you’re all doing well and staying creative. Today, I’m thrilled to share something special with you: a Lightroom Green Preset designed to elevate your photo editing process with just one click. This preset is completely free to download, making it an excellent option for anyone looking to bring a vibrant green tone to their photos without spending hours on complex edits.
Whether you are a beginner just starting with photo editing or an experienced photographer looking for a quick solution to enhance your images, this Lightroom Green Preset is a game-changer. It simplifies the process, helping you achieve a professional-level look with minimal effort. The preset adds a refreshing green hue to your photos, making them appear more dynamic and visually captivating.
With its easy application, you can quickly transform your ordinary shots into stunning works of art. The preset is versatile, perfect for various photo styles, including nature photography, portraits, and even lifestyle shots. You don’t need advanced editing skills to use it—just a few simple steps, and you’ll see incredible results in no time.
Let’s dive right into the details, where I’ll walk you through the simple steps to download and use the Lightroom Green Preset, ensuring you can get started and take your photo editing to the next level without any hassle.
So, grab your phone or computer, and let’s enhance your photos with this fantastic tool!
About the Lightroom App
Lightroom, developed by Adobe, is one of the most renowned photo editing applications, offering a comprehensive set of tools tailored to both amateur photographers and seasoned professionals. It has completely changed the way photos are edited, giving users a robust and intuitive platform that is capable of producing impressive, high-quality results.
One of Lightroom’s key features is its ability to perform professional-grade photo editing directly on mobile devices. This allows users to refine their photos with remarkable precision and ease, making it an ideal tool for photographers on the go. Additionally, Lightroom’s presets stand out as a game-changing feature. With these, users can instantly enhance their images with a single click—something that many other apps struggle to replicate, making it a unique asset for streamlining the editing process.
What truly distinguishes Lightroom from other photo-editing apps is its commitment to preserving the original quality of images. Many other applications may sacrifice resolution or clarity when editing, but Lightroom ensures that your images retain their sharpness and detail, even after extensive adjustments. Whether you’re fine-tuning a landscape shot, adjusting lighting, or adding creative effects, Lightroom consistently delivers pristine, high-quality results.
Lightroom App All Tools:
Lightroom is equipped with a vast array of powerful tools, but some of its core tools are especially essential for achieving professional-grade edits. Below are some of the key tools that make Lightroom stand out:
- Auto Tool
The Auto tool offers a convenient one-click solution to enhance the lighting and exposure of your photo. It provides quick adjustments, making it an excellent starting point for users before they dive into more detailed edits. - Light Tool
The Light tool is crucial for manually adjusting the brightness and exposure of your images. You can easily lighten or darken your photos and fine-tune the shadows, highlights, and contrast, allowing for a high degree of control over the image’s luminosity. - Color Tool
The Color tool is one of Lightroom’s most popular features, offering users complete control over the hues, saturation, and tones in their images. Whether you want to subtly enhance existing colors or create a striking color effect, this tool gives you the flexibility to shape your image’s color palette exactly how you envision it. - Effect Tools
The Effect tools allow you to apply finishing touches that add texture and other creative elements to your photo. These tools enable effects such as grain, clarity adjustments, and dehazing, all of which can bring depth and a unique feel to your images.
In addition to these core tools, Lightroom offers several advanced features for more detailed editing:
- Detail Tool: Ideal for sharpening images and reducing noise, helping to enhance fine details while maintaining the natural look of your photo.
- Optics: This tool helps you correct lens distortion, eliminate chromatic aberration, and apply lens profiles to ensure that your photos are accurate and free from distortion.
- Geometry: Perfect for architectural or landscape photography, the Geometry tool helps you straighten lines and adjust perspectives, providing precision in the composition.
- Healing: A handy tool for removing unwanted spots, blemishes, or objects from your images. It allows for seamless corrections without compromising the overall quality of your photo.
- Crop: The Crop tool lets you adjust the composition of your photo by trimming the edges, rotating, or straightening it, offering enhanced framing options for your images.
- Masking: Masking allows for targeted adjustments, letting you apply edits to specific parts of your photo—whether an isolated area or the entire image—making it ideal for detailed, precise editing.
Together, these tools make Lightroom an all-encompassing solution for anyone looking to take their photo editing to the next level, giving users the flexibility and control needed to create professional-quality images with ease.
How Do You Use Presets in the Lightroom Mobile App?
Using presets in the Lightroom Mobile app is a fantastic way to simplify and speed up your photo editing process. Presets allow you to apply a set of pre-configured settings, giving your photos a consistent and professional look with minimal effort. Whether you’re a beginner or an experienced photographer, this feature helps you achieve stunning results with just a few taps. Here’s a step-by-step guide on how to use presets in Lightroom Mobile:
1. Download and Import the Preset
- Download the Preset: When you download a preset from an external source, ensure it’s in DNG (Digital Negative) format or another compatible format for Lightroom.
- Import the Preset:
- Open the Lightroom app and navigate to the Library tab.
- Tap the Add Photos button (+ icon).
- Choose the DNG file from your phone’s storage.
- The DNG file will now appear in your Lightroom library, with the preset automatically applied to it.
2. Apply the Preset to Your Photo
- Open the Photo: Select the photo you want to edit from your Lightroom library.
- Select the DNG Preset: Scroll through your photos and choose the imported DNG file (which already has the preset applied).
- Create a New Preset: Tap the three-dot menu in the upper-right corner of the screen, then select Create Preset.
- Name the preset and choose which settings to include (you can select all or specific adjustments). Tap Save.
- Now, the preset you created will be available in your User Presets section.
3. Use the Preset on Other Photos
- Select a New Photo: Open another photo that you’d like to edit.
- Apply Your Preset: Tap the Presets button (usually located in the bottom panel). In the User Presets section, find the preset you just created and tap it to apply it to the new photo.
4. Adjust the Preset Settings (Optional)
- Fine-Tune the Image: After applying the preset, you can make further adjustments such as exposure, contrast, color saturation, etc., to better match the specific look you want for your photo.
- Save Adjustments: If you make additional edits, you can save the new combination of settings as a new preset by following the steps in Step 2.
5. Sync Presets Across Devices (Optional)
- If you have Lightroom synced with Adobe’s cloud, your presets will be accessible across all devices where you’re logged into your Adobe account. This makes it easy to use the same presets on your phone, tablet, or desktop.
6. Explore and Download More Presets
- Lightroom Mobile offers a variety of built-in presets that you can apply to your photos directly from the Discover tab.
- Additionally, you can download new presets from online sources and follow the same import process to add them to your Lightroom library.
By using Lightroom presets, you can save valuable time and ensure your photos have a cohesive, professional appearance. Whether you’re editing landscapes, portraits, or creative shots, Lightroom’s preset feature makes it easy to apply consistent, high-quality edits with just a few taps.
Lightroom Preset Features:
- Free to Download: The preset is available for free, making it an accessible tool for all photographers and creators.
- Premium Color Tones: This preset offers rich, high-quality color tones to give your photos a professional and polished look.
- Compatible with Lightroom Mobile App: Fully compatible with both iOS and Android versions of the Lightroom app, so you can edit your photos on the go.
- No Bugs: The preset is free from bugs or glitches, ensuring a smooth and seamless editing experience.
System Requirements:
- Android KitKat 4.0 or higher
- Minimum 1 GB RAM
- At least 4 GB of free storage space
- The latest version of Lightroom is installed
How to Lightroom Presets Free Download?
To download the Lightroom preset, follow these simple steps:
- Scroll down to find the download section.
- You’ll see the download option.
- Click on the option to access the preset, then tap the download button to save it directly to your device.
How to Use Green Preset?
Using the Green Lightroom preset is easy and quick. Simply follow the steps below to transform your photos with the preset:
- Download the Preset: Click the download option below to save the preset to your device.
- Open Lightroom: Launch the Lightroom app and import the preset by selecting the Add Photo option.
- Access the Preset: Open the imported preset, then tap the three dots in the upper-right corner and choose Copy Settings.
- Apply the Preset: After copying the settings, tap the checkmark at the top to confirm.
- Paste the Settings: Navigate back to your original photo, tap the three dots again, and select Paste Settings.
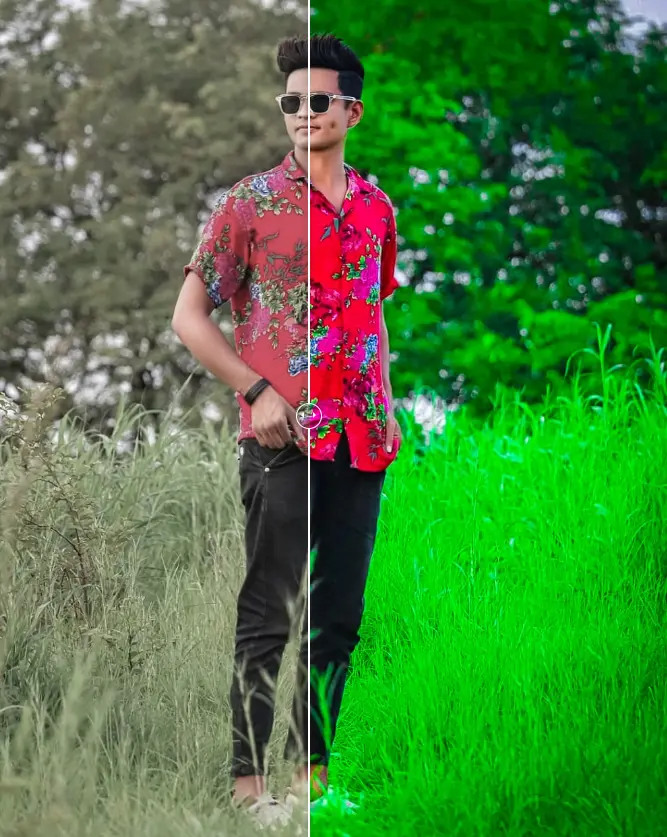
- Enjoy: The beautiful moody green tones will be instantly applied to your image, completing your photo edit in just a few easy steps.
With these steps, you can achieve stunning green-toned photos effortlessly. Enjoy your editing!
Frequently Asked Questions
What is the Lightroom Green Preset?
The Lightroom Green Preset is a pre-configured setting specifically designed to infuse your photos with a vibrant green hue. This preset provides a quick and professional way to enhance your images with just one click, making it ideal for elevating natural landscapes, portraits, or any photo where you want to bring out green tones.
How do I download the Lightroom Green Preset?
You can download the Lightroom Green Preset by clicking the download button provided on the linked page. The preset is typically available in the DNG file format, which is fully compatible with Lightroom Mobile.
Can I use the Lightroom Green Preset on mobile?
Yes, the Lightroom Green Preset is fully compatible with the Lightroom Mobile app. After downloading and importing it into the app, you can easily apply it to any of your photos for a quick edit.
Will using this preset affect my photo’s quality?
No, applying the Lightroom Green Preset will not degrade your photo’s quality. Lightroom ensures that your image retains its original resolution and sharpness even after the preset is applied.
Can I customize the Lightroom Green Preset?
Absolutely! While the preset will automatically apply a beautiful green tone to your photo, you can still make further adjustments, such as modifying exposure, contrast, or other colors to suit your personal style.
Is the Lightroom Green Preset free to use?
Yes, the Lightroom Green Preset is completely free to download and use. You can apply it to as many photos as you like with no hidden fees or charges.
Can I use the preset on both Android and iOS devices?
Yes, the Lightroom Green Preset works perfectly on both Android and iOS versions of the Lightroom Mobile app, ensuring that users across all devices can benefit from this preset.
What if the preset doesn’t work correctly on my device?
If you experience any issues, make sure you have the latest version of the Lightroom app installed. Additionally, check that your device meets the minimum system requirements. If the problem persists, restarting the app or reinstalling it may resolve the issue.
Conclusion
The Lightroom Green Preset is an invaluable tool for photographers who want to quickly enhance their images with a rich, green tone. Whether you’re just starting or have extensive editing experience, this preset makes it easy to add natural vibrance to your photos with a single click.
It’s free, easy to use, and fully compatible with Lightroom Mobile, allowing for professional-level edits without compromising image quality. Whether you’re looking to create a calming atmosphere or a more dramatic, cinematic effect, the Lightroom Green Preset provides a simple yet powerful solution.