

PicsArt Hair + Face White CB Editing is a trending and visually impactful photo editing style that has captured the attention of digital artists, influencers, and photo enthusiasts alike. This popular technique is known for its unique approach to enhancing both facial features and hair tones, resulting in eye-catching, polished images that stand out—especially on platforms like Instagram, Facebook, and Pinterest.
The core of Hair + Face White CB editing lies in its ability to whiten and brighten facial skin tones, giving the face a smooth, radiant glow while preserving natural features. This is typically done by applying advanced skin retouching tools that reduce blemishes, balance tone, and create an even complexion. At the same time, the hair is given a vibrant or stylized color treatment—ranging from natural shades like browns and blondes to bold tones like silver, icy blue, or pure white—to complement the overall aesthetic.
The term “CB” in PicsArt Hair + Face White CB Editing generally refers to “Color Balance” or “Color Boost,” depending on the context. This element of the style brings a high level of contrast and clarity to the photo, elevating the crispness and making every detail pop. The result is a clean, editorial-like finish that merges professional-quality edits with artistic flair.
PicsArt, a feature-rich mobile photo editing application, provides all the essential tools required to achieve this look. From AI-powered background removers and beautify filters to manual color grading and light adjustment features, PicsArt allows users of all skill levels to apply professional edits with ease. The app’s face smoothening, highlight enhancement, and hair color customization tools are particularly effective for CB-style edits, enabling users to control every element of the transformation.
This type of editing is widely embraced in portrait photography, model portfolios, and influencer content, where a clean white CB aesthetic is often the goal. Whether you’re aiming to create a soft, angelic vibe or a high-contrast, editorial-style portrait, the Hair + Face White CB editing method opens up limitless creative possibilities. It provides the perfect balance between realism and digital artistry, allowing you to showcase a refined, glowing, and effortlessly stylish image.
By using PicsArt Hair + Face White CB Editing, you not only enhance the natural beauty of a subject but also inject your own creative vision into each portrait. It’s more than just a filter—it’s a comprehensive approach to visual storytelling that continues to grow in popularity among content creators and digital artists.
What is the PicsArt App?
PicsArt is a powerful and highly accessible photo and video editing app designed for users of all skill levels. Launched in 2011, it has grown into one of the world’s most widely used editing platforms, especially favored by creators who want to enhance their social media content, design standout visuals, or experiment with creative effects. Whether you’re a beginner editing selfies or a professional working on brand visuals, PicsArt offers a complete set of tools tailored to every need.
This all-in-one app includes essential photo editing features like cropping, resizing, rotating, and brightness control, along with more advanced functions such as filters, text overlays, customizable stickers, and creative collage-making options. For more intricate editing, PicsArt enables background removal, object erasing, image blending, double exposure effects, and retouching tools that allow users to achieve studio-quality edits with just a few taps.
PicsArt also supports video editing and animated GIF creation, making it an ideal multimedia editor for today’s content-driven digital world. The app leverages AI-powered tools for tasks like auto background removal, skin smoothing, and facial feature enhancement—helping users make quick yet high-quality adjustments. These features are especially helpful for portrait editors, digital artists, and influencers aiming for consistent, clean aesthetics.
Beyond editing, PicsArt doubles as a creative social platform. It hosts a large global community where users can upload and showcase their work, participate in editing challenges, discover trending styles, and engage with others for feedback and collaboration. The app is available for free, but it also offers a premium subscription (PicsArt Gold) that unlocks advanced features, exclusive content, and an ad-free editing experience.
From quick touch-ups to full-scale digital art projects, PicsArt empowers users to bring any creative vision to life with ease and precision.
Why Hair & Face Whitening Matters in Photo Editing
In the realm of portrait editing, hair and face whitening has become a key component in achieving a clean, professional, and visually pleasing image. These techniques aren’t about altering natural beauty, but rather enhancing clarity, tone, and symmetry to reflect a polished look that stands out in both personal and professional settings.
- Brighten the Face: Skin whitening or tone correction helps reduce the visibility of shadows, blemishes, and uneven color caused by poor lighting. By brightening the facial area, the subject’s features appear more defined and naturally radiant.
- Enhance Hair Color: Hair often loses vibrancy due to lighting conditions, camera quality, or environmental factors. Whitening or light-enhancing tools can bring out richer textures and livelier tones, creating a healthier, shinier appearance in photos.
- Improve Lighting Balance: Uneven lighting during the shoot can leave parts of the face or hair looking dark or dull. Whitening helps correct these inconsistencies, ensuring a well-balanced, evenly lit portrait.
- Perfect Overall Appearance: Subtle whitening effects can smooth out skin discolorations, highlight key facial features, and enhance symmetry. When done right, it results in a refined and flattering image without sacrificing authenticity.
Whether you’re editing for social media, digital portfolios, or personal keepsakes, incorporating face and hair whitening techniques can significantly elevate the visual appeal of your portraits. Tools like those offered in PicsArt make it simple to apply these adjustments with precision, offering both automatic and manual control to suit every style preference.
How to Use PicsArt for Hair & Face Whitening: A Step-by-Step Guide
PicsArt provides a powerful yet user-friendly platform for editing photos, making it easy to achieve professional-looking results right from your phone or desktop. Whether you’re enhancing a portrait for social media or creating an eye-catching profile picture, the hair and face whitening feature can help you create a clean, vibrant look. Follow this detailed step-by-step guide to learn how to use PicsArt’s whitening tools effectively.
Step 1: Open Your Photo in PicsArt
Begin by launching the PicsArt app. On the home screen, tap the “+” icon to browse your gallery and select the image you want to edit. Once the photo loads, you’ll be directed to the editing interface, where you can begin customizing your look.
Step 2: Navigate to the “Tools” Menu
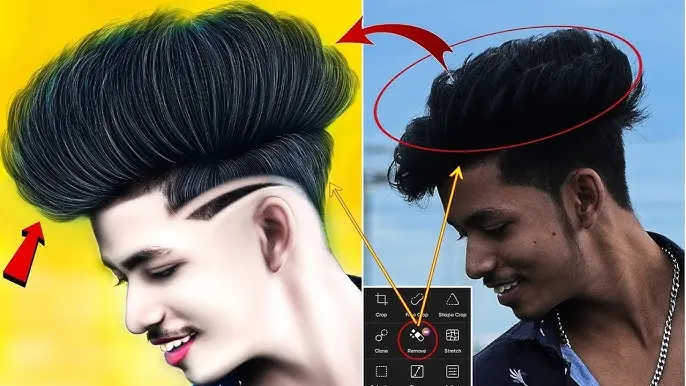
At the bottom of the screen, you’ll see a toolbar with multiple editing options. Tap on “Tools” to access a variety of core features like crop, perspective, stretch, and more. For hair and face whitening, the most important tool here is the “Whiten” option, designed to brighten targeted areas of your photo.
Step 3: Select the “Whiten” Tool
In the Tools menu, locate and tap the “Whiten” tool. This function typically opens a brush interface, allowing you to manually apply the whitening effect to specific areas of your image. You’ll also gain access to customization sliders for both brush size and intensity, ensuring more precise control over your edits.
Step 4: Adjust the Brush Size and Intensity
Before applying any effect, take a moment to adjust the brush settings to match the area you’re editing.
- Brush Size: Use a smaller brush for detailed facial areas such as under the eyes, nose bridge, or around the lips. Use a larger brush for broader areas like the forehead, cheeks, or sections of the hair.
- Intensity: This slider controls how strong the whitening effect appears. For a natural edit, keep the intensity lower; for more dramatic results, raise it moderately.
Step 5: Apply Whitening to the Hair & Face
Carefully brush over the areas you want to enhance. Use gentle, even strokes to avoid streaks or unnatural bright spots. Focus on:
- Face: Target dull or shadowed areas like under the eyes, cheekbones, or forehead. The whitening effect helps to illuminate the skin, offering a smoother, more even complexion.
- Hair: Apply the effect over darker or lifeless parts of the hair to add shine and highlight, especially around the crown and edges. Whitening can subtly enhance color definition and give hair a healthier, more radiant look.
Step 6: Refine the Edges
After applying the effect, it’s important to clean up any accidental overpainting. Use the “Erase” tool within the Whiten menu to gently remove excess whitening from areas like the eyes, lips, or background. Zoom in for more precision and adjust your brush size for finer control. This step ensures a natural finish without harsh transitions or overexposed spots.
Step 7: Check Your Work
Take a moment to zoom out and review the overall look of your image. Ask yourself:
- Does the whitening appear natural?
- Are the features well-balanced?
- Is there any area that looks too bright or washed out?
If needed, use the undo feature to make corrections or reapply the effect more subtly.
Step 8: Final Adjustments
After refining your whitening edits, you can further enhance the image by adjusting global settings. Tap on the “Adjust” option to fine-tune:
- Brightness & Contrast for better lighting balance
- Saturation to enrich color tones
- Smooth or Skin Tone tools for refining the skin’s texture and hue
These finishing touches help tie your edits together and give your photo a professional, polished look.
Step 9: Save and Share
Once you’re satisfied with the final result, tap the checkmark to apply the edits. Then, select the “Download” or “Share” option to save your high-resolution image to your device or post it directly on platforms like Instagram, Facebook, or WhatsApp. PicsArt supports exporting in high quality, ensuring your edits maintain their clarity and detail.
With these easy-to-follow steps, PicsArt’s hair and face whitening tools empower you to transform ordinary portraits into standout visuals. Whether you’re preparing a profile update, creating content for social media, or simply exploring your creativity, this technique offers a simple yet powerful way to elevate your images.
Tips for Natural-Looking Whitening
Achieving a clean and polished appearance in your edits doesn’t mean going overboard. Natural-looking whitening is all about balance, subtlety, and technique. Here are some expert tips to ensure your whitening effects enhance rather than overpower your photos:
Don’t Overdo It
Subtlety is key when applying face and hair whitening effects. While it may be tempting to brighten areas dramatically, over-whitening can quickly make a photo look unnatural or overly processed. Instead, focus on light, gradual enhancements that bring out the natural beauty of the subject. A slight touch of brightness can be far more visually appealing than stark, artificial edits.
Blend Seamlessly
A seamless blend between whitened areas and untouched portions of the image is essential for a natural look. Avoid creating harsh contrasts or visible brush marks. Use gentle strokes with moderate intensity and consider zooming in during application to ensure precision. A well-blended effect should enhance the face or hair while maintaining realistic textures and tones.
Use the “Erase” Tool
The “Erase” function in PicsArt is incredibly helpful for correcting over-applied whitening. After brushing on the effect, zoom in and carefully inspect the image. If any sections look too bright or extend beyond the intended area—like spilling onto clothing, eyes, or background—use the erase tool to clean up those regions. This ensures the whitening effect remains targeted and controlled.
Focus on Lighting
Enhancing the overall lighting of your photo can significantly improve the look of your whitening edits. Rather than relying solely on the whiten tool, try adjusting the brightness, exposure, or highlights using the “Adjust” settings. Proper lighting brings out natural contrast and vibrancy, helping the whitening effect blend more organically with the rest of the image.
By applying these tips, you can elevate your photo edits with a refined and professional touch. Whether you’re preparing a portrait for social media or fine-tuning a creative project, these strategies will help you achieve bright, flawless results without sacrificing authenticity.
Frequently Asked Questions
What is the “Hair + Face White CB” editing style in PicsArt?
The “Hair + Face White CB” editing style is a specialized photo editing technique designed to enhance facial features and hair for a more radiant and refined appearance. It typically includes whitening the skin tone, smoothing the face, and brightening or color-correcting the hair. The term “CB” often refers to a clean and bright filter or preset used to achieve a professional, polished look—ideal for portraits and social media-ready visuals.
Can I create the “Hair + Face White CB” look without a premium subscription?
Yes, you can achieve the core elements of the “Hair + Face White CB” effect using the free tools available in PicsArt. Essential features like brightness adjustment, basic retouching, skin smoothing, and hair lightening are accessible without a paid plan. However, certain advanced effects, high-resolution exports, and exclusive filters may require a PicsArt Gold subscription.
Is it possible to over-edit and make the photo look unnatural with this style?
Absolutely. Overusing whitening or smoothing tools can lead to an artificial or overly “airbrushed” appearance. To avoid this, apply effects gradually and use tools like the opacity slider to control intensity. Aim for a balanced look that enhances natural beauty while keeping the edit subtle and realistic.
How do I adjust the intensity of the whitening effect?
After selecting the whitening tool in PicsArt, look for the Opacity or Intensity slider, usually located at the bottom or side of the editing panel. By reducing the opacity, you can create a softer, more natural look. Increasing it will produce a bolder, more dramatic effect. Adjust the setting until the result looks clean but not exaggerated.
Can I use the “Hair + Face White CB” style on a photo with multiple people?
Yes, this style can be applied to group photos. To edit specific individuals without affecting the entire image, use the Brush Tool or Masking Tool. These allow you to precisely target areas like one person’s face or hair, keeping the edits localized and preventing unintended changes to other subjects or the background.
Can I undo my edits if I don’t like the final result?
Yes, PicsArt includes an Undo button for quick corrections, along with a History feature that lets you step back through each change you’ve made. If an edit doesn’t look right, simply go back to a previous version or start over with ease.
Does the “Hair + Face White CB” editing style work on all skin tones?
Yes, this style can be applied to any skin tone. However, it’s important to adjust the whitening effect thoughtfully to maintain a natural appearance. On darker skin tones, over-whitening can look unrealistic or distort facial features. Use blending and intensity controls to ensure the final result complements the subject’s natural complexion.
Conclusion
The PicsArt Hair + Face White CB editing style is a transformative and accessible technique that enhances portraits by whitening skin, refining facial details, and brightening hair tones. It’s a favorite among content creators, influencers, and photography enthusiasts for achieving a crisp, aesthetically pleasing finish.
This style is especially effective for social media posts, profile photos, and creative projects where a clean, high-impact look is desired. While the tools required are largely free and user-friendly, the real art lies in applying them with care. Avoid heavy-handed edits, and use features like opacity, masking, and blending to ensure a natural, flattering outcome.
Whether you’re a beginner or a seasoned editor, PicsArt’s versatile toolkit makes it easy to master the Hair + Face White CB style and create standout visuals that truly shine.